
In the shop
I’m delighted to present a new knitting pattern designed by EclatDuSoleil/Hélène Marcy: the shawlette La vie en rose!
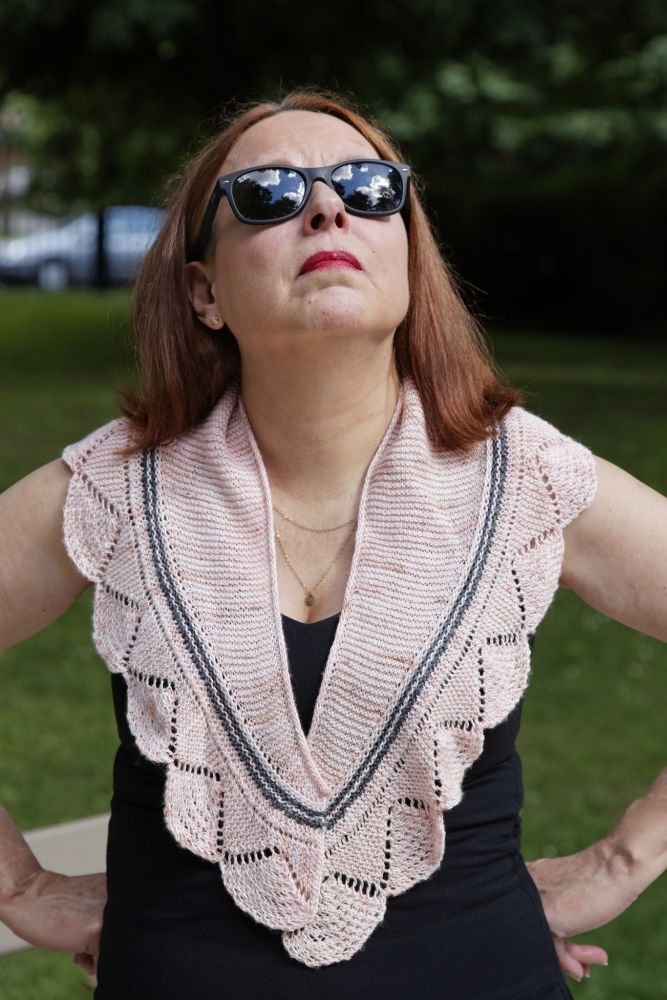
Based on an old Shetland lace border, this is an interesting and fun project to knit. And 400 meters / 440 yds of fingering weight yarn is enough for the shawl!
The pattern La vie en rose is available in my shop.
Crocheted chevrons
In the current newsletter series on colour, we have already discussed stripes. However, crocheted stripes can be so much more than straight horizontal lines. One of the shapes a crocheted stripe can take is a zig-zag: chevrons.
Anatomy of chevrons:
To transform a straight line into a zig-zag, you need…
![]()
… A : increases, to create « peaks ».
B: decreases, to create « valleys » (and compensate for the increases)
C: straight lines (sloping diagonally) to go from peak to valley.
Let’s have a closer look at a few different chevron patterns.
A general note:
Turning chains do not count as stitches, and are not included in the multiples indicated for each stitch pattern.
Chevron 1
![]()
Worked over a multiple of 12.
Row 1: Ch 2 (do not count as a st, here and throughout), 2 dc in the 3rd ch from the hook, 1 dc in each of next 3 ch, repeat (dc2tog in next 2 sts) twice, 1 dc in each of next 3 ch, 2 dc in next ch, * 2 dc in next ch, 1 dc in each of next 3 ch, repeat (dc2tog in next 2 sts) twice, 1 dc in each of next 3 ch, 2 dc in next ch; repeat from * to end of row.
Row 2: Ch 2, 2 dc in first st, 1 dc in each of next 3 sts, repeat (dc2tog in next 2 sts) twice, 1 dc in each of next 3 sts, 2 dc in next st, * 2 dc in next st, 1 dc in each of next 3 sts, repeat (dc2tog in next 2 sts) twice, 1 dc in each of next 3 sts, 2 dc in next st; repeat from * to end of row.
Repeat row 2 for pattern.
This is what we get:
![]()
A rather soft wave, undulating in tranquility. Increases at the peaks are made by increasing 1 st in 2 separate stitches, one for each slope down to the valley. The decreases in the valley are also paired, to absorb the stitches increased to create the peak.
If we want to sharpen this zig-zag pattern, there are (at least) two parameters to play with: the concentration of increases/decreases and the height of the stitches. Let’s see how that can work.
Chevron 2
![]()
Multiple of 10 + 1.
Row 1: Ch 2 (do not count as a st, here and throughout), 2 dc in the 3rd ch from the hook, 1 dc in each of next 3 ch, dc3tog in next 3 sts, 1 dc in each of next 3 ch, * 3 dc in next ch, 1 dc in each of next 3 ch, dc3tog in next 3 sts, 1 dc in each of next 3 ch; repeat from * to end of row, 2 dc in last st.
Row 2: Ch 2, 2 dc in first st, 1 dc in each of next 3 sts, dc3tog in next 3 sts, 1 dc in each of next 3 sts, * 3 dc in next st, 1 dc in each of next 3 sts, dc3tog in next 3 sts, 1 dc in each of next 3 sts; repeat from * to end of row, 2 dc in last st.
Repeat row 2 for pattern.
In this stitch pattern, the increases and decreases are more concentrated. All the increases at the peak are made in the same stitch. The decreases in the valleys are no longer made over 4 stitches, but over 3.
![]()
This makes for sharper angles in the pattern. The « turns » are taken more markedly. The general impression is more geometric and less wavelike.
Chevron 3
![]()
Multiple of 10 + 1.
Row 1: Ch 1 (do not count as a st, here and throughout), 2 sc in the 2nd ch from the hook, 1 sc in each of next 3 ch, sc3tog in next 3 sts, 1 sc in each of next 3 ch, * 3 sc in next ch, 1 sc in each of next 3 ch, sc3tog in next 3 sts, 1 sc in each of next 3 ch; repeat from * to end of row, 2 sc in last st.
Row 2: Ch 1, 2 sc in first st, 1 sc in each of next 3 sts, sc3tog in next 3 sts, 1 sc in each of next 3 sts, * 3 sc in next st, 1 sc in each of next 3 sts, sc3tog in next 3 sts, 1 sc in each of next 3 sts; repeat from * to end of row, 2 sc in last st.
Repeat row 2 for pattern.
This pattern is a variation on chevron 2 above. The number of stitches and the construction are identical – only the height of the stitches changes. The dc’s have been replaced by sc’s.
![]()
This chevron shows an even sharper zig-zag. Of course, the swatch is also denser and much smaller!
Chevron 4
There is another parameter that we haven’t touched on yet – the length of the « straight line » (sitting diagonally in the fabric), the slope between peaks and valleys.
![]()
Multiple of 6 + 1.
Row 1: Ch 2 (do not count as a st, here and throughout), 2 dc in the 3rd ch from the hook, 1 dc in next ch, dc3tog in next 3 sts, 1 dc in next ch, * 3 dc in next ch, 1 dc in next ch, dc3tog in next 3 sts, 1 dc in next ch; repeat from * to end of row, 2 dc in last st.
Row 2: Ch 2, 2 dc in first st, 1 dc in next st, dc3tog in next 3 sts, 1 dc in next st, * 3 dc in next st, 1 dc in next st, dc3tog in next 3 sts, 1 dc in next st; repeat from * to end of row, 2 dc in last st.
Repeat row 2 for pattern.
This stitch pattern is another variation on chevron 2 above, including only 1 dc (instead of 3) between increases and decreases.
![]()
This pattern takes its rhythm more from the change of direction than from the angles. The shorter slopes give it a softer and more wavelike character – at least from my point of view!
I encourage you to experiment further with these parameters. Among other options are the possibilities to include openwork or clusters, to work under one loop only or to mix stitches of different heights. The list can go on and on!
As always, please feel free to share your ideas, questions or suggestions in the comments below.
The next newsletter (the July/August issue) will be published at the end of August.
Have a lovely summer!
See you soon!
