
Chevrons: increases
In June we discussed chevrons – another kind of crocheted stripes.
I wanted to go a bit deeper into the topic of chevrons, specifically to find methods for increasing and decreasing in this kind of stitch pattern. In this newsletter, we will discuss increases; the decreases will follow!
There are, of course, many different ways to tackle increases in a chevron pattern. I set out with two basic principles: I decided to increase by one stitch per row, and I wanted to maintain the chevron pattern as well as possible while adding stitches. The method I found is a starting point that can be refined, but I still think it’s interesting to share with you.
First, let’s go through some terminology – expressions that I more or less made up for this purpose, to be able to structure my ideas and explain them to you.
![]()
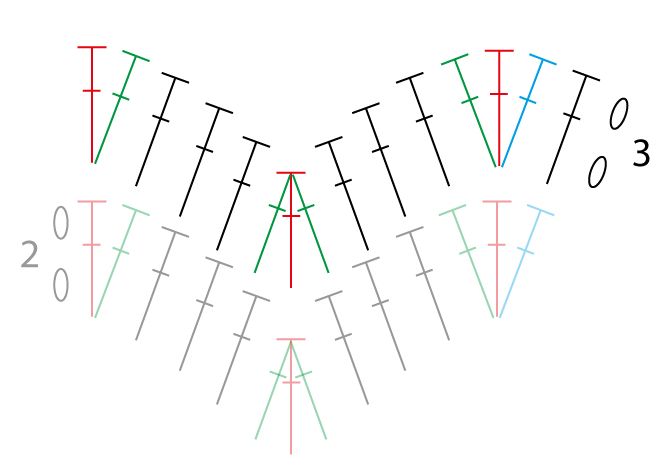
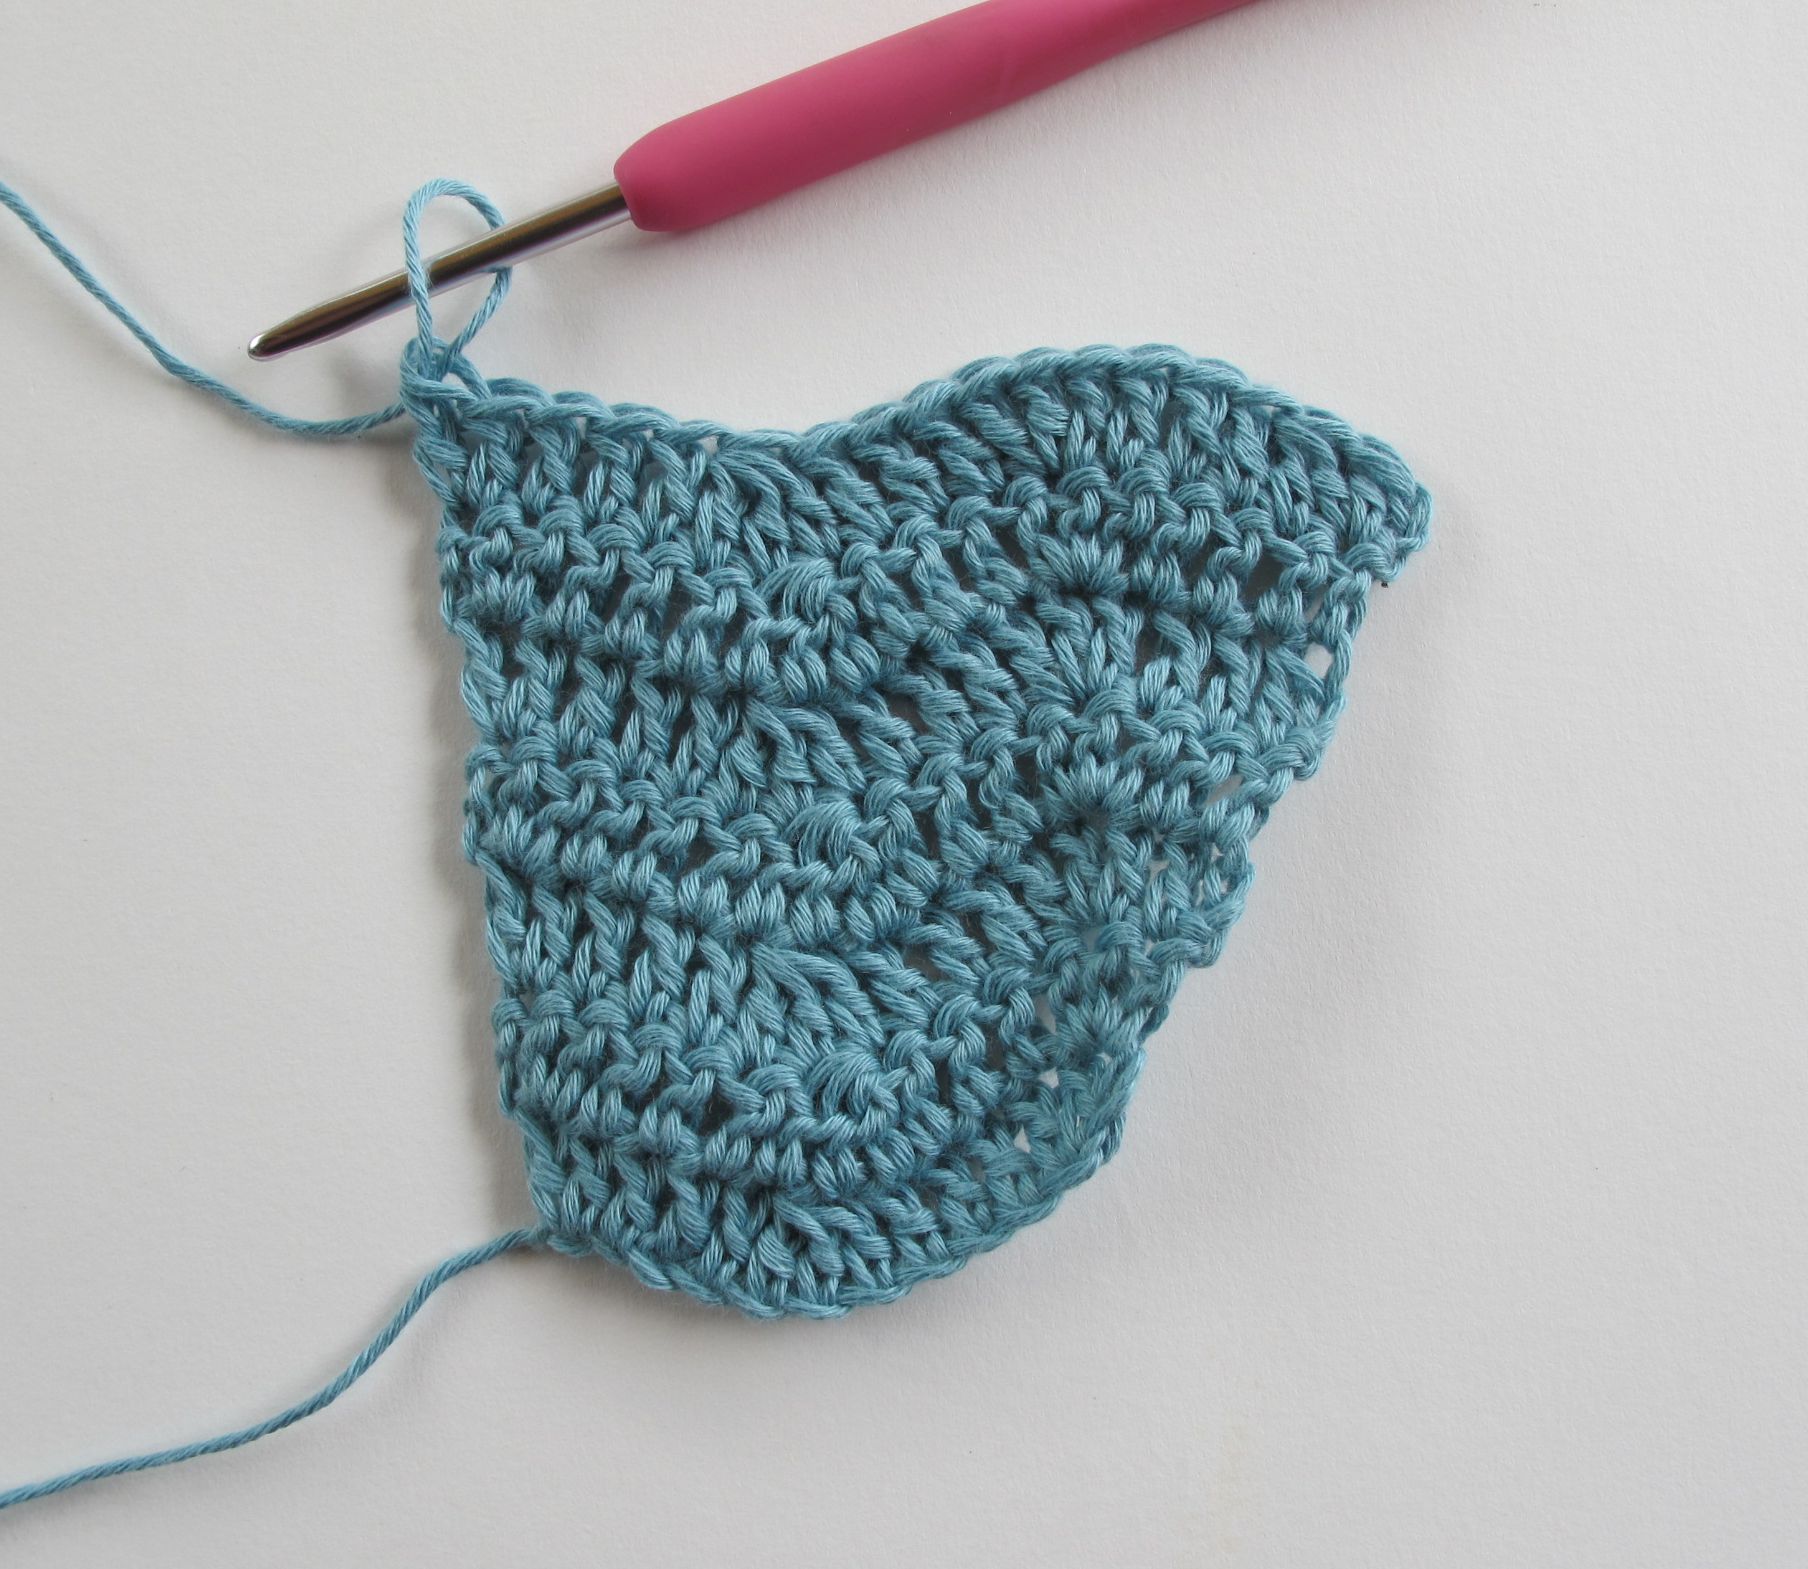
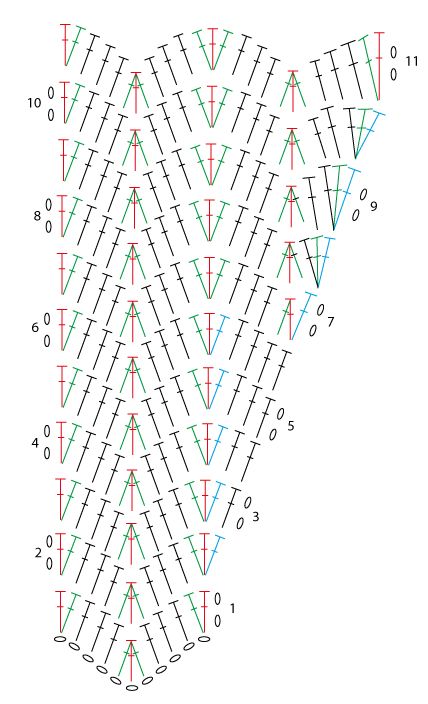
This is the stitch pattern I’m going to use as an example for the increases. It has 3 dc’s between the increases and decreases that shape the chevron pattern. This chart was already included in the June newsletter, but you will notice that I used colours a bit differently this time.
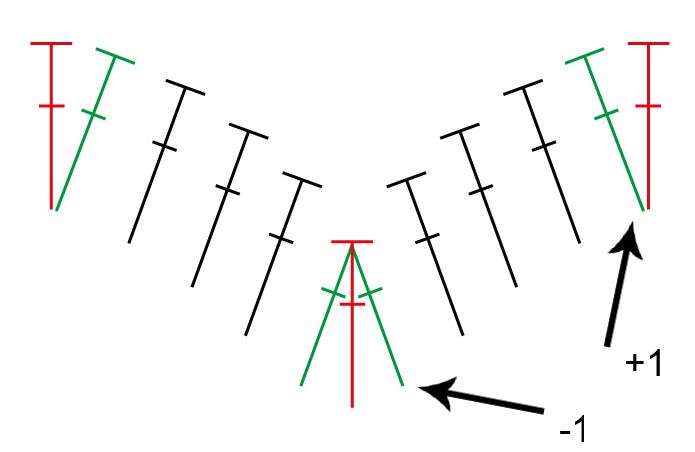
The red stitches are the « backbone stitches, » the ones that structure the whole pattern. On each side of every backbone stitch, there are green stitches. Those are the « compensation stitches. » Their role is twofold: create the zig-zag of the chevron pattern and maintain the stitch count. For each added compensation stitch, there is another that subtracts a stitch.
A general note:
Turning chains do not count as stitches in the instructions below.
Let’s start crocheting!
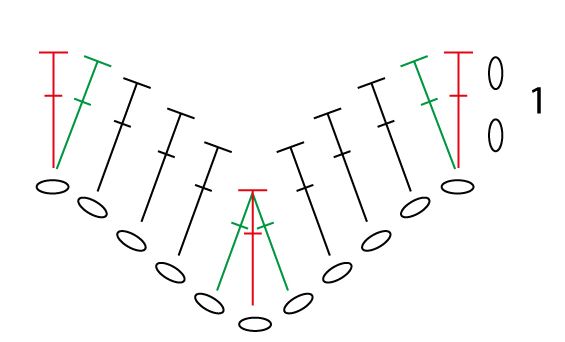 Ch 11 + 2 = 13
Row 1: 2 dc in the 3rd ch from the hook, 1 dc in each of next 3 ch, dc3tog in next 3 ch, 1 dc in each of next 3 ch, 2 dc in last ch.
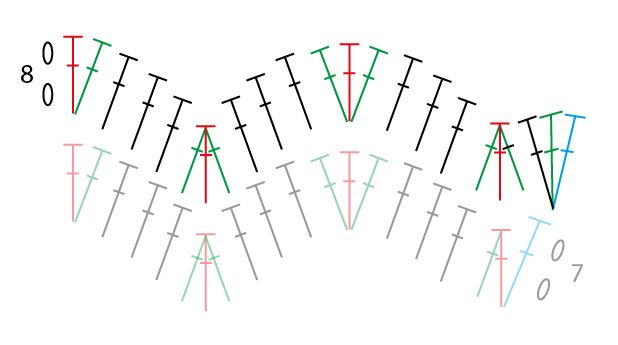
We are going to increase at the selvedge on the right-hand side of the chart. This means that our increases will be made at the beginning of odd-numbered rows and at the end of even-numbered rows. The first increase is made at the end of row 2.
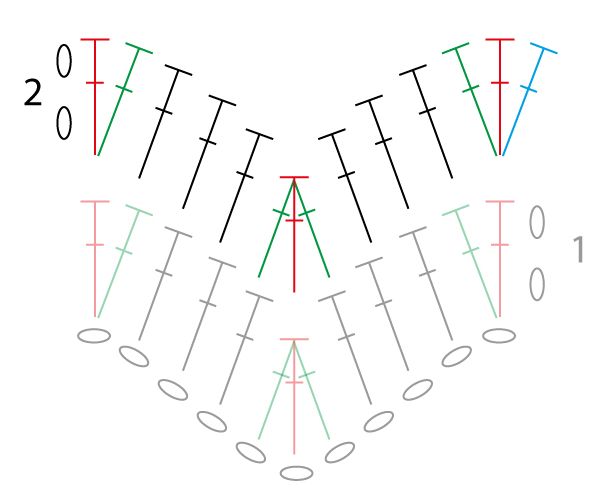
Row 2: Ch 2, 2 dc in first st, 1 dc in each of next 3 sts, dc3tog in next 3 sts, 1 dc in each of next 3 sts, 3 dc in last st.

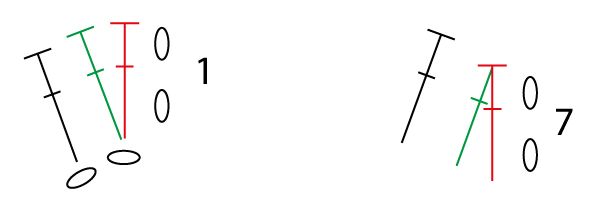
In the chart, the last stitch in row 2 is blue – this is how I will identify increase stitches that add a stitch to the row.
Row 3: Ch 2, 1 dc in first st, 3 dc in next st, 1 dc in each of next 3 sts, dc3tog in next 3 sts, 1 dc in each of next 3 sts, 2 dc in last st.

This is an even-numbered row, which means that the increase is made at the beginning of the row. The colours in the chart show that the increase stitch is not the first stitch in the row – the first stitch is simply a stitch worked into one in the previous row. The increase stitch is the blue stitch. It could be taken for a compensation stitch, but is not compensated by a decrease. It increases the number of stitches in the row by one.

Row 4: Ch 2, 2 dc in first st, 1 dc in each of next 3 sts, dc3tog in next 3 sts, 1 dc in each of next 3 sts, 3 dc in next st, 1 dc in each of 2 last sts.
Row 5: Ch 2, 1 dc in each of first 3 sts, 3 dc in next st, 1 dc in each of next 3 sts, dc3tog in next 3 sts, 1 dc in each of next 3 sts, 2 dc in last st.
Row 6: Ch 2, 2 dc in first st, 1 dc in each of next 3 sts, dc3tog in next 3 sts, 1 dc in each of next 3 sts, 3 dc in next st, 1 dc in each of 4 last sts.

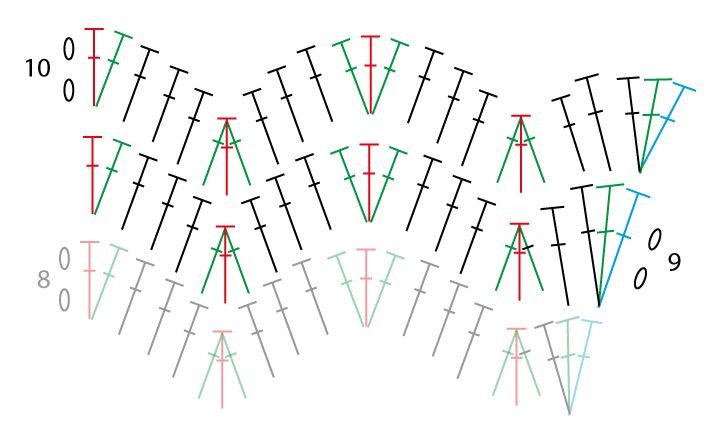
We continue the increases in the same way. Please note that you need to increase enough to have 4 « normal » (black) dc’s after the « 3-dc in same st. »
Now we have increased enough to reestablish a backbone stitch at the selvedge. If from this point we want to continue working straight, without shaping, we can work the following row like this:
Row 7: Ch 2, dc2tog in the first 2 sts, 1 dc in each of next 3 sts, 3 dc in next st, 1 dc in each of next 3 sts, dc3tog in next 3 sts, 1 dc in each of next 3 sts, 2 dc in last st.
However, if we want to add a full horizontal stitch repeat and obtain two symmetrical selvedges, we need to continue increasing. But the new backbone stitch at the right selvedge plays a different role from to the one at the start. Up to now, we made our increases next to a backbone stitch at the top of a zig-zag. Now we are going to make them next to a backbone stitch at the bottom of a zig-zag.
 To continue increasing, we can work row 7 as follows:
Row 7: Ch 2, 1 dc in first st, dc2tog in first and second st, 1 dc in each of next 3 sts, 3 dc in next st, 1 dc in each of next 3 sts, dc3tog in next 3 sts, 1 dc in each of next 3 sts, 2 dc in last st.
The first stitch in the row is an increase stitch (blue), which will serve as the basis for the increase in the following row.
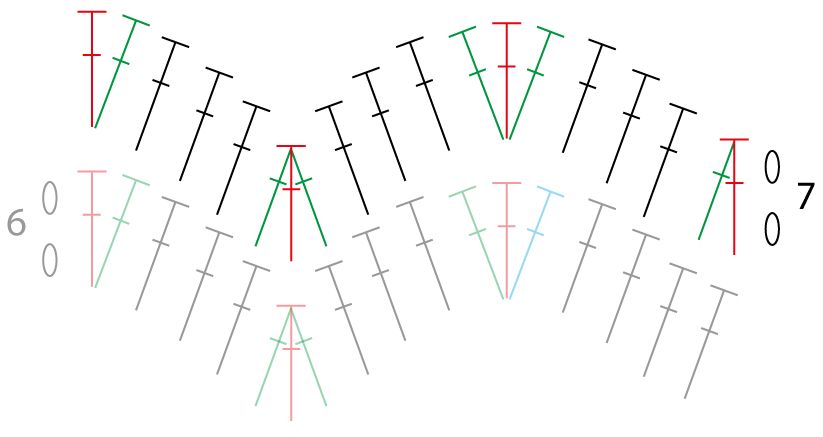
However, it very quickly becomes clear that we can’t simply add a single stitch in each row to continue increasing. In order to maintain the chevron pattern, we must as soon as possible add a decreasing compensation stitch to the right of the backbone stitch. This means that we need 1 stitch to maintain the increase in the row below (black) + 1 compensation stitch to balance the decrease compensation at the backbone stitch (green) + 1 increase stitch to continue increasing 1 stitch per row (blue).
Row 8, where we increase at the end of the row, will be worked as follows:
Row 8: Ch 2, 2 dc in first st, 1 dc in each of next 3 sts, dc3tog in next 3 sts, 1 dc in each of next 3 sts, 3 dc in next st, 1 dc in each of next 3 sts, dc3tog in last 3 sts, 3 dc in last st.

The increases are continued with a « bouquet » of 3 stitches along the increase selvedge.
Row 9: Ch 2, 3 dc in first st, 1 dc in next st, dc3tog in next 3 sts, 1 dc in each of next 3 sts, 3 dc in next st, 1 dc in each of next 3 sts, dc3tog in next 3 sts, 1 dc in each of next 3 sts, 2 dc in last st.
Row 10: Ch 2, 2 dc in first st, 1 dc in each of next 3 sts, dc3tog in next 3 sts, 1 dc in each of next 3 sts, 3 dc in next st, 1 dc in each of next 3 sts, dc3tog in next 3 sts, 1 dc in each of next 2 sts, 3 dc in last st.

In row 10, we have 3 black dc’s to the right of the backbone stitch. This means that we can reestablish the chevron pattern to continue straight.
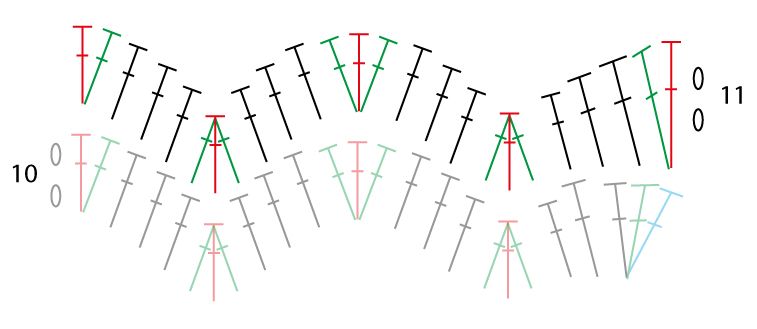
Row 11: Ch 2, 2 dc in first st, 1 dc in each of next 3 sts, dc3tog in next 3 sts, 1 dc in each of next 3 sts, 3 dc in next st, 1 dc in each of next 3 sts, dc3tog in next 3 sts, 1 dc in each of next 3 sts, 2 dc in last st.

We did it! We went through all the steps to add a full horizontal repeat to our chevron stitch pattern.
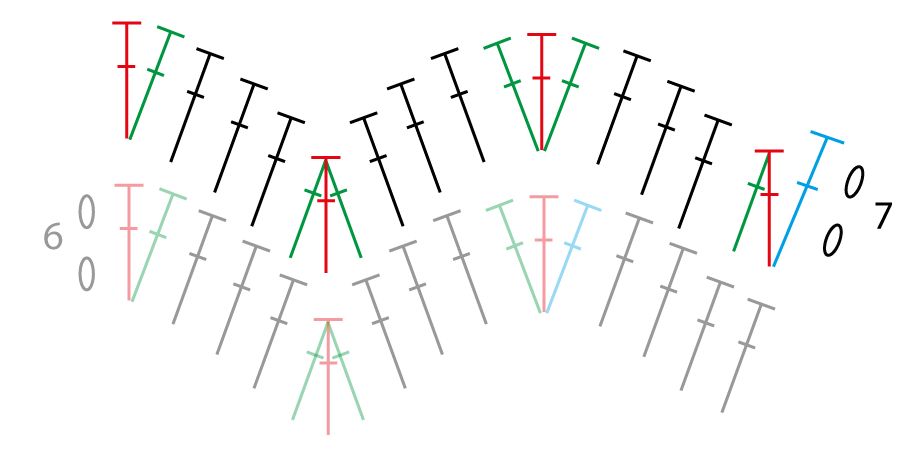
This is the complete chart:
You can also download it in pdf format here: Chevron increases
Thank you for reading this long newsletter! Please feel free to share your ideas and suggestions in the comments below.
Next time, we will be decreasing!
See you soon!
