
Newsletter March 2011: Increasing in a non-linear stitch patternNews:If you had any doubts about the creativity and productivity of designer EclatDuSoleil, you can let go of them now. I have yet again the pleasure to present a new design of hers – a so-called « baktus, » named Solveig.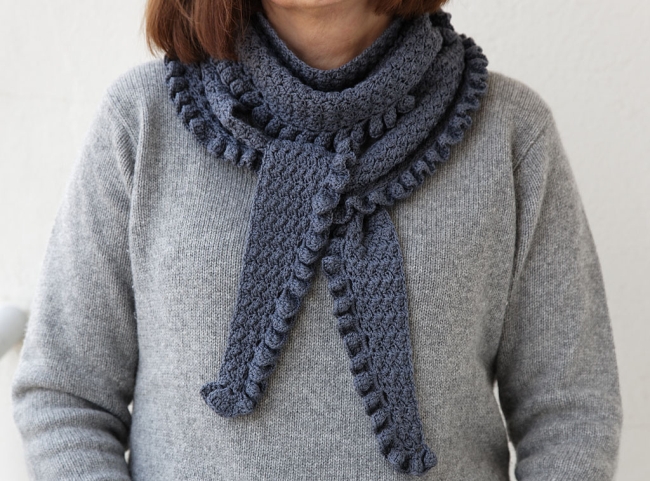 Solveig is worked from one end to the other (that’s what makes it a « baktus »), with the ruffled edging added at the end. You can wear it in a million ways; the only limit is your imagination!
 The pattern contains the detailed directions for the grey version, and help to adapt the pattern to the yarn you have at hand – this is what EclatDuSoleil did very successfully in the blue version, worked in Mini-Mochi.More details in the shop, of course!Increasing in a non-linear stitch pattern:One of the wonderful features of crochet is the variety of ways stitches can be placed in a row. Sometimes, the stitches will sit nicely, straight up and side by side in a row. This row will be distinct from the others, with no interlocking or zigzagging. This is what I would call a linear stitch pattern – solid dc, for example (or solid any stitch, by the way).Other times (quite often, actually), the stitches will be placed differently. They will bend or cross, and the rows may interlock with each other. This is something we can call a non-linear stitch pattern, and there are hundreds of them.These stitch patterns are often beautiful. With them, we can obtain interesting textures, colourwork or lace. Exploring all these stitch patterns is one of the great joys of crochet.You will, however, find mostly simple designs using these stitch patterns. Washcloths, pillow covers, blankets … square or rectangular things. The reason is that increasing and decreasing are much more complicated in a non-linear stitch pattern than in a linear one. You can’t just skip a stitch or work two together to decrease, nor can you simply work two stitches in one to increase. You need to look carefully at how the stitch pattern is constructed, decide on what you want to do with it, and work out how through trial and error – a process that can take hours.Of course, you may say that you don’t need to do anything shaped with these stitch patterns, that it’s enough to let them shine in a simple square or rectangle. I personally believe that it’s a pity to limit yourself to very simple designs, and not use these fabulous stitch arrangements in more complex shapes. I also believe that this is one of the hurdles in the development of crochet, and that designers need to stretch themselves to continue to push the limits of the art and technique of crochet.Designer extraordinaire EclatDuSoleil did exactly that in the Solveig shawlette, presented above. She has very kindly given me permission to use the increase technique in this pattern as an example of how increases in a non-linear stitch pattern can be achieved. The pattern for Solveig is illustrated with detailed step-by-step photos, so here I decided to use stitch diagrams instead.This is the stitch pattern used in Solveig:
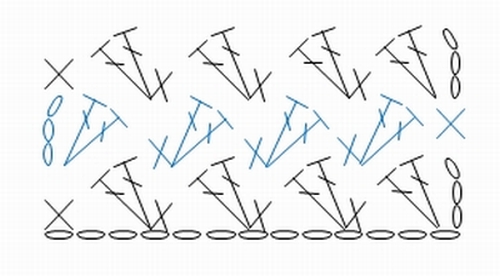 The stitch pattern is formed by groups of (1 sc + 2 dc). Since the stitches are of different heights, they bend over and create a kind of zigzag shape, with rows that interlock more deeply than the diagram can show. (The stitches in the diagram need to be more spaced out than in the crocheted fabric, in order to keep the diagram clear.) The beginning and end of each row are quite straightforward – but how do we increase in this pattern?We obviously need to add a new (1 sc + 2 dc) group. It’s possible to figure out a way to simply add a group at the beginning or end of a row – but his would create a very abrupt increase, which might even distort the fabric.After a lot of testing, EclatDuSoleil designed a subtler increase, worked over a total of three rows.The increase starts at the end of the first increase row. Instead of working just a sc in the top of the turning chain, you work (1 sc + 1 dc).
 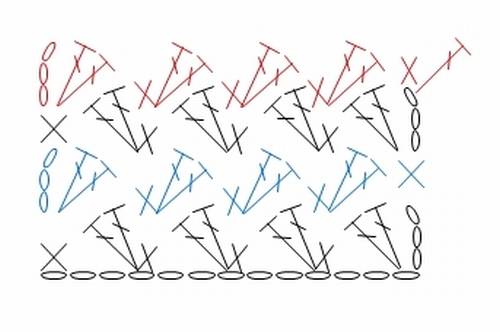 The next row starts with 2 ch (one less than in the other rows) and 1 dc in the last dc made. You work a full (1 sc + 2 dc) group in the sc, and finish the row in the established pattern.
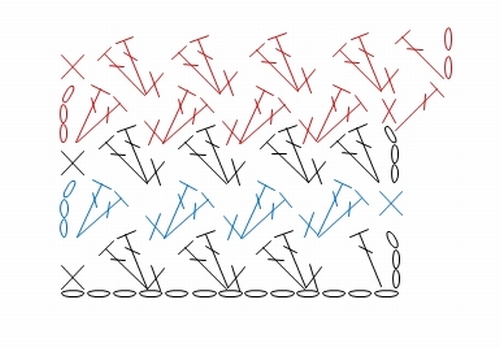 On the final increase row, you finish with a sc in the top of the 2-ch turning chain.
  And you are back to a « normal », straight row.
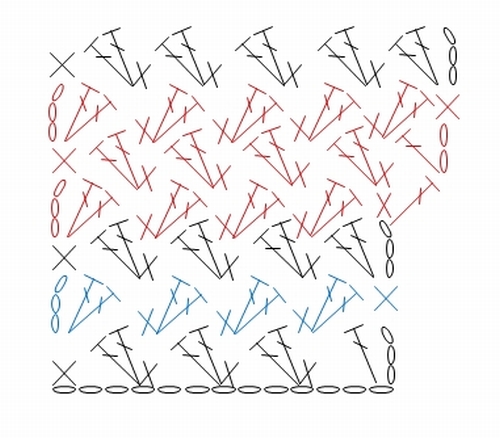 This creates a softly rounded increase that is both decorative and well integrated into the crocheted fabric. For information on the decreases, please refer to the pattern!I hope this will inspire you to try out different ways to increase and decrease the next time you find a great stitch pattern and want to make something from it that is not a square. See you soon!
Un commentaire pour “Annette Petavy Design – Newsletter March 2011 – Increasing in a non-linear stitch pattern”