
Basic Half Circle Shawl Shapes
I continue my adventures in basic shawl shapes. Last month it was about triangular shawls; this month it’s about semicircular ones.
This shawl shape is currently a very popular one, so it was great fun to play around a little with it.Here are the results (at least so far!). All of the shapes below are worked top-down.
1. Basic half circle
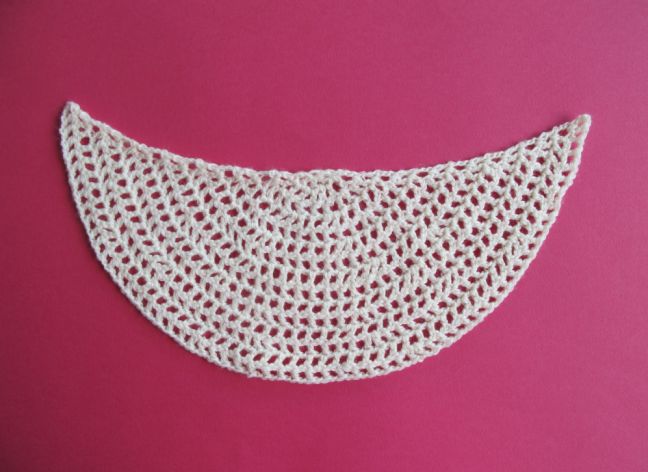
To obtain a crocheted half circle you will, of course, base your calculations on the rules for crocheted circles, as discussed in the newsletter for November 2012. However, if applying these calculations strictly, you will not really obtain a half circle.
To work a circle in solid dc’s, you need to increase 12 dc on every round. If you start a half circle in dc’s, increasing 6 dc on every row, you will soon find that the shape you obtain is a little less than half a circle. The tension is not distributed in exactly the same way as in a circle, where there is a pull on the stitches from both sides, so the stitches don’t place themselves the same way.
So when I work a half circle shawl based on dc’s, I try to increase 8 stitches in every row. This means that instead of a shape that’s not quite a half circle, I obtain a shape that’s a little more than a half circle. For a shawl, this is definitely desirable, at least in my opinion. If the « wings » curve slightly upward, the shawl will be easier to wear and will sit better on your shoulders or around your neck.
I tend to emphasize this by placing an increase at the beginning and end of every row.
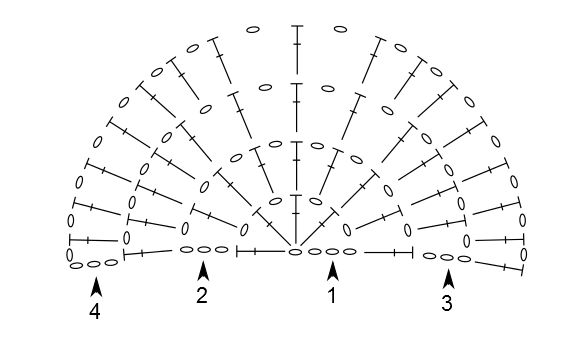 Row 1: Ch 5 (counts as 1 ch + 1 dc + 1 ch), 1 dc in 5th ch from hook, [ch 1, 1 dc] 3 times, all in same ch as 1st dc. — 5 dc and 4 ch spaces.
Row 2: Ch 4 (counts as 1 dc + 1 ch), 1 dc in first ch space, ch 1, 1 dc in next dc, ch 1, 1 dc in next ch space, ch 1, 1 dc in next dc (= center st), ch 1, 1 dc in next ch space, ch 1, 1 dc in next dc, ch 1, 1 dc in last ch space, ch 1, 1 dc in 4th ch at beginning of previous row. — 9 dc and 8 ch spaces (4 dc increased).
It is helpful to place a marker in the center st and move it up with every row.
Row 3: Ch 4 (counts as 1 dc + 1 ch), 1 dc in first ch space, ch 1, 1 dc in next dc, ch 1, 1 dc in next ch space, [ch 1, 1 dc in next dc] 5 times, ch 1, 1 dc in next ch space, ch 1, 1 dc in next dc, ch 1, 1 dc in last ch space, ch 1, 1 dc in 3rd ch at beginning of previous row. — 13 dc and 12 ch spaces (4 dc increased).
Row 4: Ch 4 (counts as 1 dc + 1 ch), 1 dc in first ch space, [ch 1, 1 dc in next dc] 4 times, ch 1, 1 dc in next ch space, [ch 1, 1 dc in next dc] 3 times, ch 1, 1 dc in next ch space, [ch 1, 1 dc in next dc] 4 times, ch 1, 1 dc in last ch space, ch 1, 1 dc in 3rd ch at beginning of previous row. — 17 dc and 16 ch spaces (4 dc increased).
Note that there are 4 increases in every row, each increase including 2 stitches (1 dc + 1 ch), so the total number of stitches increased in every row is 8.
From row 5, you continue to place an increase at the beginning and the end of each row (= 2 increases) The other 2 increases should be staggered, placed differently in every row, so that the shape remains well rounded and does not become angular. This is how I do it:
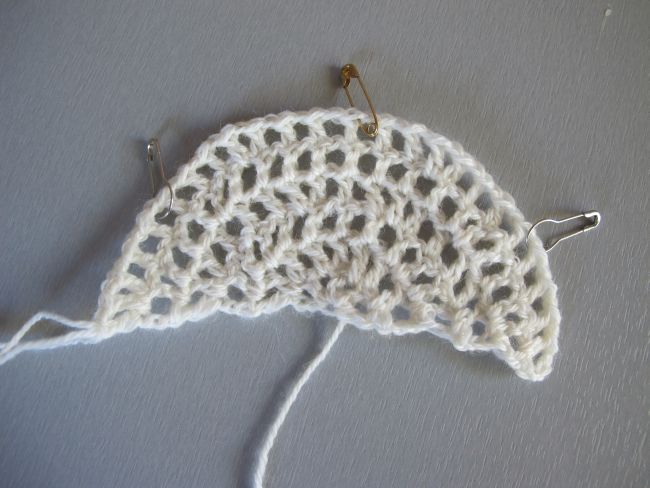
The golden safety pin marks the center stitch. The silver safety pins without coils mark the ch spaces where I will work my increases on the next row. They shouldn’t be placed straight over the increases in the previous row.When the project is small, it is easy enough to count the ch spaces, but when it grows, this becomes time-consuming. To place markers before working a row, fold the project in half, using the center stitch marker as a guide.
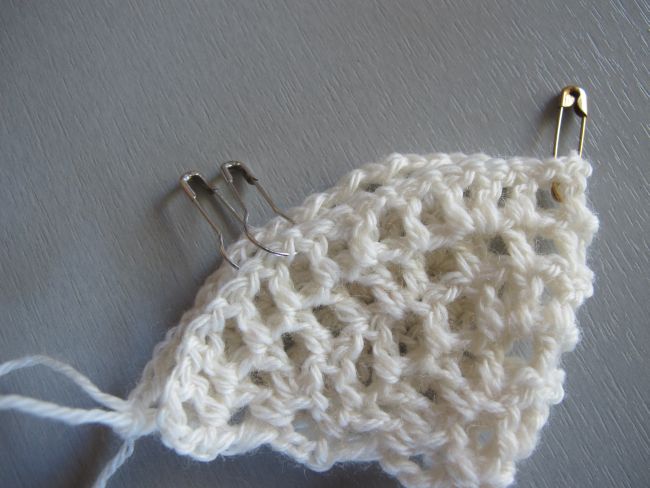
Insert the markers in two corresponding ch spaces at each side of the center stitch. With a small-scale repetitive stitch pattern like this, exact placement is not crucial – if the increases are not exactly symmetrical, it will hardly show in the finished shawl.
2. Half circle with elongated wings
As I said, I emphasize the curved wings of the shawl by always working an increase at the beginning and end of each row.You can push this further by inserting an extra increase at the beginning and end of certain rows. This is what I did here.
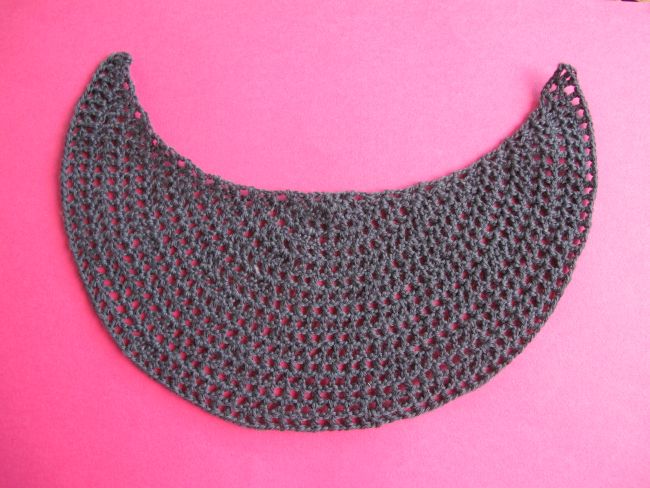
Rows 1 to 5 are worked exactly as before. On row 6 I worked two extra increases: one just after the one at the beginning of the row (in the second ch space of the row) and the other one just before the increase at the end of the row (in the next-to-last ch space of the row). The staggered increases were maintained on this row (6 dc increased).I repeated the extra increases every 3rd row. As you can see, this accentuates the curve at the top edge of the shawl and creates slightly longer wings.
This shape will be more pronounced as more rows are worked. Please feel free to play around with the placement of these increases, inserting them more frequently or with more rows between them.
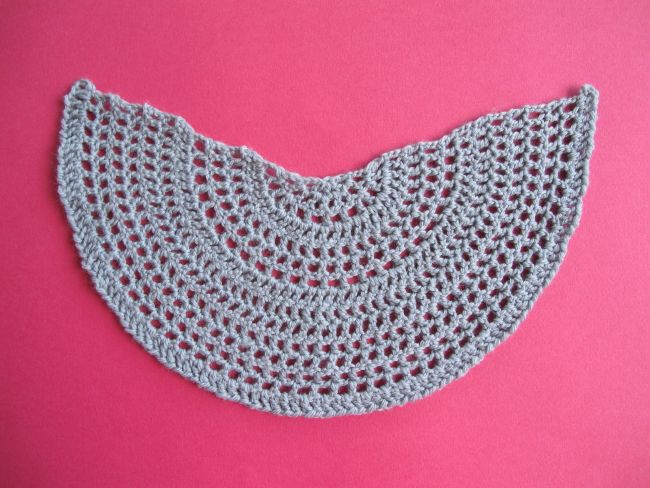
3. Pi-inspired half circle
The pi shawl (pi as in mathematics, not as in dessert), was an « unvention » of the brilliant knitter Elizabeth Zimmermann. When working a pi shawl, increases are concentrated in certain rows. Usually, you more or less double the number of stitches on every increase row, and the further your shawl grows, the further apart your increases need to be worked.
I wanted to play with this concept, initially worked as a knitted circular shawl, and adapt it to a crocheted half circle.
Rows 1 – 3: As for basic half circle above. There are 13 dc and 12 ch spaces.
Row 4 (increase row): Ch 4 (counts as 1 dc + 1 ch), 1 dc in first ch space, ch 1, 1 dc in next dc, [ch 1, 1 dc in next ch space, ch 1, 1 dc in next dc] to end of row, placing last dc in 3rd ch at beginning of previous row. — 25 dc and 24 ch spaces (12 dc increased).
Rows 5 – 7: Ch 4 (counts as 1 dc + 1 ch), 1 dc in next dc, [ch 1, 1 dc in next dc] to end of row, placing last dc in 3rd ch at beginning of previous row.
Row 8 (increase row): As row 4. — 49 dc and 48 ch spaces (24 dc increased).
Row 9 – 14: As rows 5 – 7.
Row 15 (increase row): As row 4.
Between the first increase row (row 4) and the second increase row (row 8) I could work 3 rows without increases. Between the second and the third increase row (row 15), I could work 6 rows without increases. You will need to experiment to see exactly how many rows are possible to work straight before every new increase row, but the increase rows will be spaced farther and farther apart.
This is, of course, very interesting if you want to add sections with elaborate stitch patterns, since this eliminates the need to incorporate the increases directly into the stitch pattern. But I must admit that I’m quite enthralled with the look of this simple filet pattern worked like this. The filet stitches are under varying tension on different rows. The tension is much lower at the increase row and just after, but it makes the ch spaces open up gradually as rows are added, until a new increase row is needed. Quite a sophisticated look, using a very simple technique.
The slight drawback is that the upper edge of the shawl is a bit more irregular with this technique – however, I think that the unevenness can easily be hidden in a small edging.
I hope this has given you some ideas and has made you want to pull out your hook and play with half circles! Feel free to comment below and tell me what you think or show me what you make.
See you soon!
