Newsletter April 2011: My first adventure in slip stitch crochetNews:Yet again I’m happy to present a new beautiful shawl design by EclatDuSoleil – or should I say two new designs? Pipistrelle comes in two versions in the same pattern. Both are based on the same chevron stitch pattern, but each shawl uses it to a different effect.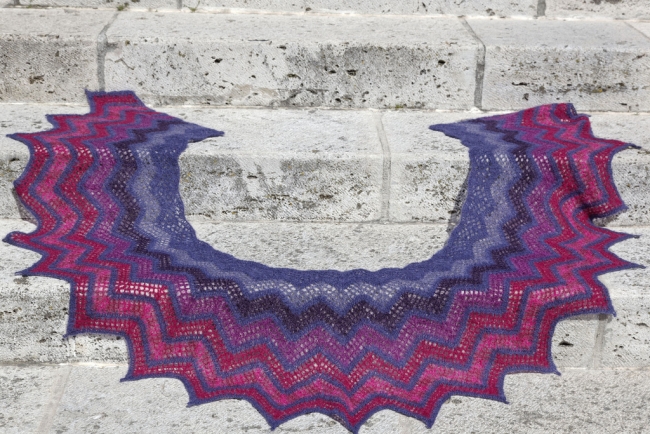 The smaller shawl, worked in a multitude of colours, starts with a long upper edge. You can wear it wrapped around your neck or shoulders, or tied as a large scarf.
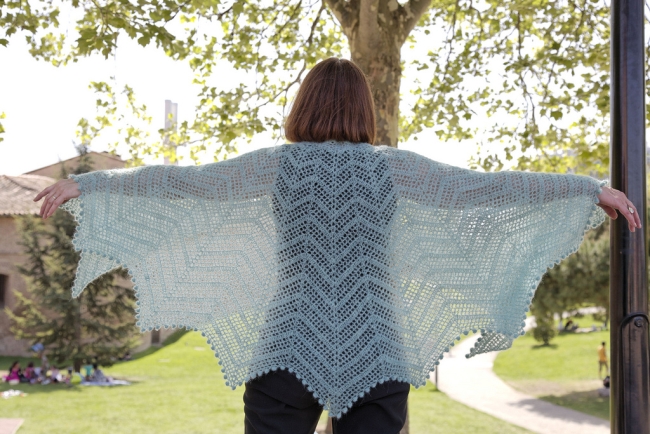 The larger version starts out with a relatively narrow upper edge and branches out toward the bottom. It can be worn as a beautiful lace cape. It is finished with a pretty pom-pom edge.Both versions can be worked in either fine mohair or a smooth laceweight yarn. You will find more details in the shop.My first adventure in slip stitch crochet:One of the major trends in crochet during the past year or two has been the renewed interest in slip stitch crochet. The slip stitch is the simplest of all crochet stitches, the stitch that requires the least manipulation of the yarn. It might even be the oldest crochet stitch – as far as I know, the oldest examples of crochet that have been found are worked in this technique. The traditional slip stitch crochet is also known as Bosnian crochet, and I believe the technique is used in several countries in eastern Europe and western Asia. This type of crochet has also been used in the Nordic countries, among them my native Sweden. This traditional technique is worked almost exclusively in the round.However, with the upsurge of interest in crochet, it was only a matter of time before someone started to look very closely at this type of crocheting. I’m sure there are many, many people who have done so – but say « slip stitch crochet » and I immediately think « David Burchall ». David has a very interesting website where you can find plenty of information about slip stitch crochet, including ways of making the stitch that I never knew before. If you’re on Ravelry, David is also active in the Slip Stitch Crochet group there, where more information can be found.For my first adventure in slip stitch crochet I also relied on a very interesting Swedish book, Smygmaskvirkning by Kerstin Jönsson. It’s a self-published book, available only in Swedish and not easy to find. I learned about if from a Raveler who sent me a message wondering if I could translate the book into English. It’s an interesting idea, but a huge project!Up to now, I had only used slip stitches in the common way – that is, as a nonstitch. As I say to my crochet students, the slip stitch is used to close a circle or connect pieces, or to « travel » to another place in your work without adding additional stitches or rows. Now it was time for me to explore slip stitches in a completely different way – as the very components of a crocheted fabric.First of all, I had to consider the tools to use for my slip stitch crochet. Together with the Swedish book, I bought a funny-looking hook, made by the author. I know it’s the type of hook traditionally used in Sweden (and several other countries) for this type of crochet. The websites I consulted also talked about « inline » hooks vs « bulbous » hooks. I had to get these concepts clearly before I could start.
 You can see all three types of hooks in the picture above. The specific slip stitch hook is immediately recognizable at left. It is flat, cut out of a sheet of metal, very pointy with a rounded handle.I tried working with this hook. A pointy hook is desired in slip stitch crochet because slip stitches, even worked loosely, can be hard to work into. I think this one would need some sanding down, though – it’s so pointy I found it almost impossible not to split the yarn.My major problem working with this hook was not its sharp tip (I could have fixed that). Also, with the help of the book, it was not too difficult to find a reasonably good way to hold the hook – as Kerstin Jönsson points out, a flat tool is not used in the same way as a rounded one. My biggest difficulty was obtaining even-sized stitches.Look at the flared shape of the hook under the head and down the handle. The size of your stitches will depend entirely on how far down on the hook you push the yarn loop you’re working. I understand that this makes the hook a very versatile tool, and that a skilled slip stitch crocheter should be able to adapt the stitch size according to the yarn used and the desired outcome. To me, as a total beginner, it was a bit much to handle. I decided that this hook should be reserved for later, when I hope I will be a bit more advanced. (I also started nourishing a dream about going to Sweden to take a class in traditional slip stitch crochet – who knows, one day it may come true!)So my quest for a tool remained unsolved. I had to take a closer look at the question of the inline hook.
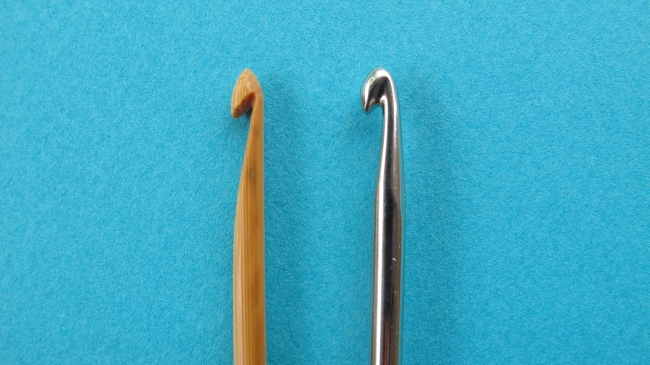 If you look closely at the two hooks in this picture, you can see that the head of the hook to the left is exactly aligned with the width of the shaft (the straight part of the hook). It’s an inline hook. To the right, the head of the hook seems larger than the shaft, and is not aligned. The left edge of the head is farther to the left than the left edge of the shaft. This type of hook is sometimes referred to as a bulbous hook.Inline hooks are reputed to be better suited for slip stitch crochet. The bamboo hook at left is also much pointier than the other one, so I selected it to continue my testing. It’s the only hook of this type I own, and it’s a 4 mm (US G-6) hook. Since I had read that you should go up in hook size when doing slip stitch crochet with a conventional hook, I tested it with a fingering weight yarn. I usually work this type of yarn with a 3 mm (US C-2 or D-3) hook, sometimes going up to 3.5 mm (US E-4) for better drape.So, how did it go? Well, let’s simply say that it wasn’t pretty, and it wasn’t fun. I was struggling with my hook, struggling with my stitches, struggling with my yarn. I was seriously thinking that it had been a bad, bad idea to do a newsletter on slip stitch crochet. I made unintentional decreases, I split the yarn, I had to wrestle the tip of the hook through the stitches. It took forever to make a single, misshapen row. And worst of all, as I said, it wasn’t fun. Crochet is supposed to be fun, at least in my book.Then, I a) had a realization and b) made a decision, almost at the same time. I suddenly realized that when people said you had to work slip stitch crochet very loosely, they meant VERY loosely. Much, much, much more loosely than my usual (pretty loose) way to crochet. And looking through my collection of hooks, I found a 6 mm (US J-10) hook that looked reasonably pointy. I decided to try it on DK-weight cotton yarn – a yarn weight I usually work with a 4 mm (US G-6) hook. So this time, the hook was a full 2 mm larger than the one I would usually use.And suddenly, it started to work.
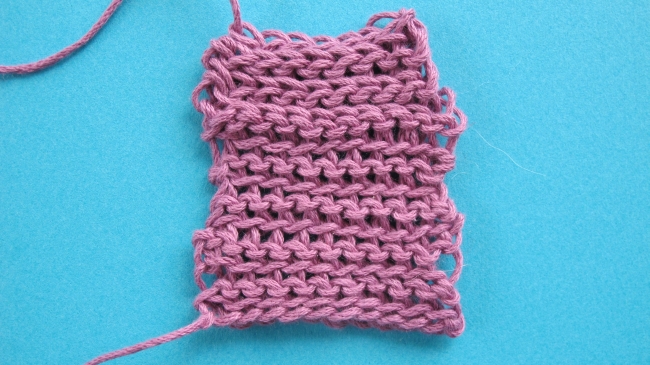 I crocheted so loosely I had the feeling I hardly crocheted at all. I seemed to just whisk around with my hook in the air. The stitches were horribly loose, but as soon as I worked another row into them, they tightened up and looked better. I worked back and forth, testing to work into the front loop or the back loop of the yarn. I still had some problems with skipped stitches, but it started to look like something at least. And now, it was fun!Next step was to use the same hook with a slightly thinner alpaca yarn, and to do what people have done for centuries – work slip stitch crochet in the round. Now, things really clicked. I had lots of fun, and I loved the look of my work!I proceeded to work a long swatch.
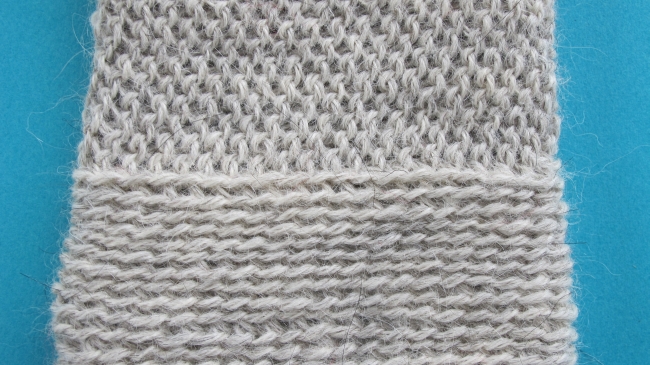 I started by working into the back loop of each stitch (at bottom of picture). This makes a fabric that lies flat, so it is commonly used as an edging for mittens or hats, when you don’t want the edge to roll. Slip stitch in the back loop (sl st blo, or in David Burchall’s notation, B) worked in the round creates a soft and textured fabric with narrow horizontal bars.I switched to working in the front loop, and the difference was astounding (at top of picture). I have previously discussed how different a stitch can look depending on which loop you work through, but I think this is the most striking example I’ve seen so far. Again the fabric is textured, but it’s noticeably thinner and flatter than working through the back loop. The texture is bumpier, but with an impression of nearly vertical lines, leaning slightly to the right.It was getting late, but I had to try at least some type of colourwork.
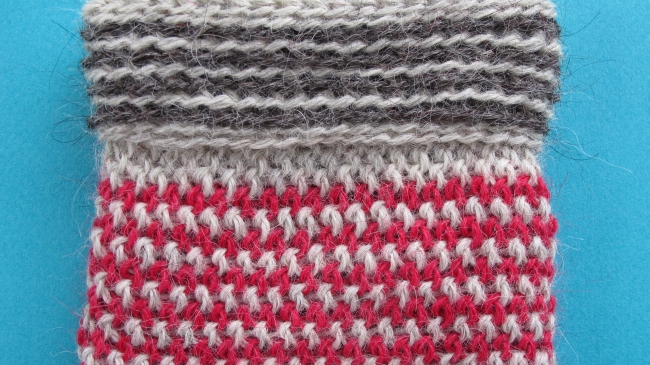 I decided on one-row stripes, first in red, working through the front loop (at bottom of picture), and then in dark grey through the back loop (at top of picture). As you can see, the effect is once more very different.I was very surprised to see how soft and squishy the fabric in my swatch turned out. I thought it would very firm, but not at all.
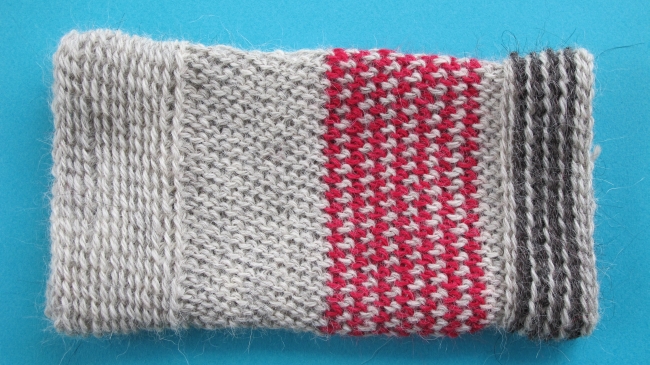 There are so many things to explore in this technique. I’m setting off on a hunt for inline bamboo hooks in larger sizes, my mind full of ideas and techniques to try out. I hope you feel inspired too! See you soon!