
Basic Triangular Shawl Shapes
I have been thinking about basic formulas for crochet shawl shapes for quite some time now. One can easily find quite a few resources on basic formulas for knitted shawls, but they seem to be much fewer for crochet.
One of the reasons for this is, of course, the many variations in row and stitch gauge that are possible in crochet. When you work out how to create a specific shape, the row-gauge ratio is the foundation on which you need to build. In crochet, different kinds of stitches and stitch patterns will affect this ratio tremendously – much more so than in knitting (even if variations exist there too).
However, many, many crochet stitch patterns are based on dc’s – so that seems to be a good place to start. One of the most common dc stitch patterns is filet: alternating dc’s and 1-ch spaces, and working dc into dc on all rows.
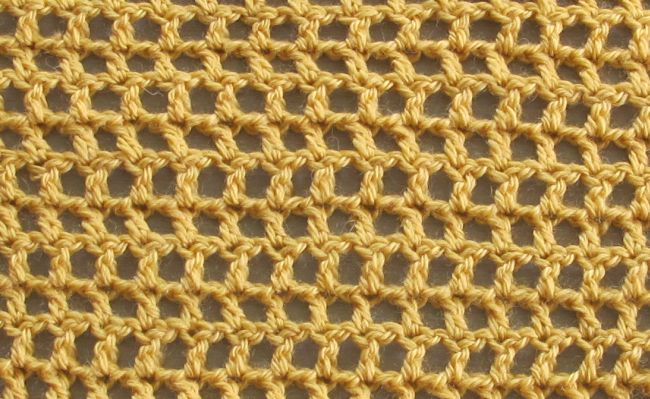
A simple filet stitch works great if you want to whip up a simple project (shawl, scarf, bag, you name it). It is particularly useful when using a yarn that you want to let shine on its own, without competing with an intricate stitch pattern. Also, I have found that filet stitch often is a useful starting point when you want to develop your own stitch patterns. And since we are talking about shawls, the chain spaces create a naturally drapey fabric, which is most interesting when it comes to shawls.
So I decided to use filet as my stitch when developing these basic shawl shapes. This means that the indications aren’t universal – but they should be easily adaptable to a large number of stitch patterns.
1: Top-down triangle
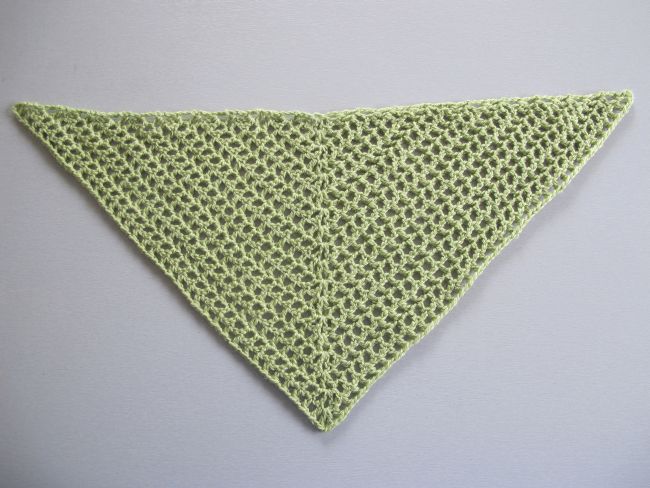
This makes a « true » triangle, where the depth at the tip equals half the length of the upper edge.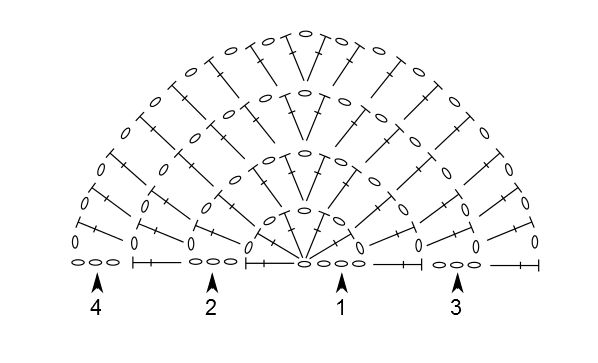 Row 1: Ch 5 (counts as 1 ch + 1 dc + 1 ch), 1 dc in 5th ch from hook, [ch 1, 1 dc] 4 times, all in same ch as 1st dc. — 6 dc and 5 ch spaces.
Row 2: Ch 4 (counts as 1 dc + 1 ch), 1 dc in first ch space, [ch 1, 1 dc in next dc] twice, ch 1, (1 dc, ch 1, 1 dc) in next ch space (= center V-st), [ch 1, 1 dc in next dc] twice, ch 1, 1 dc in next ch space, ch 1, 1 dc in 4th ch at beginning of previous row. — 10 dc and 9 ch spaces (4 dc increased). If you want, place a marker in the center V-st and move it up with every row.
The increases are made in the center of the row, by adding a new center V-st, and at the beginning and end of the row, by adding 1 dc in the first and last ch space.
Row 3: Ch 4 (counts as 1 dc + 1 ch), 1 dc in first ch space, [ch 1, 1 dc in next dc] until 1 dc has been worked in first dc of center V-stitch, ch 1, (1 dc, ch 1, 1 dc) in ch-space in center V-st, [ch 1, 1 dc in next dc] until 1 dc has been worked in last dc before 4-ch space at beginning of previous row, ch 1, 1 dc in ch-space, ch 1, 1 dc in 3rd ch at beginning of previous row.
Repeat row 3 to desired size.
2: Top-down triangle with elongated tips
This triangle has a longer upper edge compared to its depth. In my example, this shape is created by an extra increase at the beginning and end of every 4th row. The shape will be more accentuated the more rows you work. If you want, you can play with the extra increases. Increasing more frequently will create even longer tips (that can arch somewhat upwards), and spacing out the increases will create moderately elongated tips.
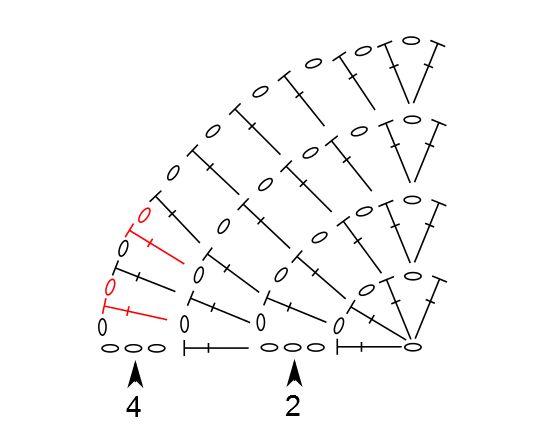
The chart shows only half the triangle – the extra increases are done at the beginning and end of every 4th row.
Rows 1 – 3: As for Triangle 1.
Row 4: Ch 4 (counts as 1 dc + 1 ch), 1 dc in first ch space, ch 1, 1 dc in next dc, ch 1, 1 dc in next ch space, [ch 1, 1 dc in next dc] until 1 dc has been worked in first dc of center V-stitch, ch 1, (1 dc, ch 1, 1 dc) in ch-space in center V-st, [ch 1, 1 dc in next dc] until 1 dc has been worked in the next to last dc before 4-ch space at beginning of previous row, ch 1, 1 dc in next ch space, ch 1, 1 dc in next dc, ch 1, 1 dc in last ch space, ch 1, 1 dc in 3rd ch at beginning of previous row.
The extra increase is made by adding 1 dc in the second ch space at the beginning of the row and in the next to last ch space at the end of the row.
Rows 5 – 7: As for row 3.
Row 8: As for row 4.
Repeat rows 5 – 8 to desired size.
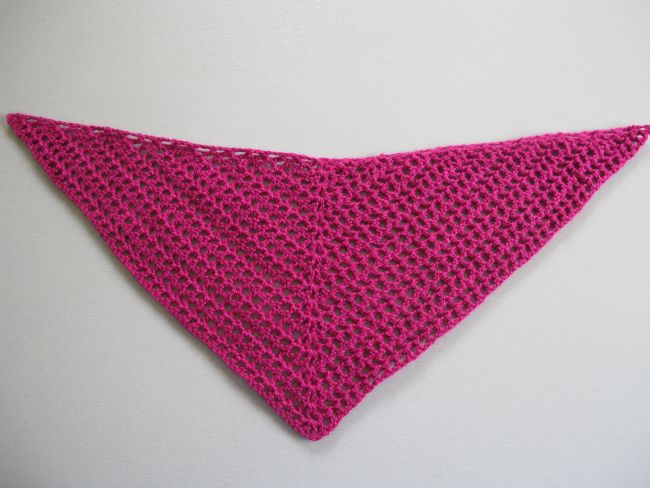
3: Bottom-up triangle
This triangle is quite different. It is worked from the bottom up, and the rows are worked horizontally. This enables you to start with a small number of stitches but to present the stitch pattern in a way that is different from the top-down shawls. The ratio between depth and upper edge is very close to a true triangle.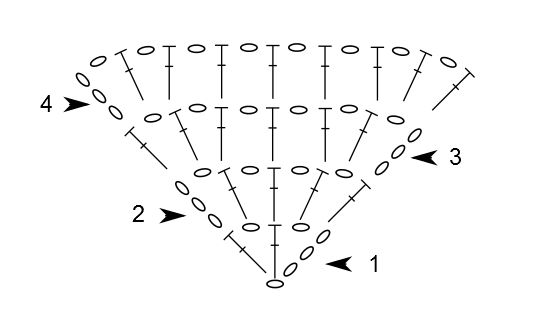 Row 1: Ch 5 (counts as 1 ch + 1 dc + 1 ch), (1 dc, ch 1, 1 dc) in 5th ch from hook. — 3 dc and 2 ch spaces.
Row 2: Ch 4 (counts as 1 dc + 1 ch), 1 dc in next ch space, ch 1, 1 dc in next dc, ch 1, 1 dc in next ch space, ch 1, 1 dc in 3rd ch at beginning of previous row.
Row 3: Ch 4 (counts as 1 dc + 1 ch), 1 dc in next ch space, [ch 1, 1 dc i next dc] until 1 dc has been worked in last dc before 4-ch space at beginning of previous row, ch 1, 1 dc in ch space, ch 1, 1 dc in 3rd ch at beginning of previous row.
Repeat row 3 to desired size.
The increases are made only at the beginning and end of each row, by adding 1 dc in the first and last ch space.
So there you have 3 ideas to play around with, using different increase ratios, different yarns, and adapting them to different stitch patterns!
If you want to, please feel free to share your projects and swatches in the comments below.
See you soon!
