Newsletter July 2012: Post stitches, part 2News:Last month, I told you about the beautiful laceweight yarn London, a 50% silk/50% wool blend. This lovely yarn hasn’t failed to inspire the very talented EclatDuSoleil. Her new design is a shawlette named Silk Scarf. Worked from the bottom tip up, this shawlette is made from two balls of London yarn. The pattern also indicates how to make a larger version and adapt it to the quantity of yarn available.More information in the shop.Post stitches, part 2Last month, I discussed the basic techniques for making post stitches, which stand out or recede from the surface of the crocheted fabric. This time, I wanted to show you a few ways to use these stitches.A very well known use for post stitches is to work a structured fabric to mimic ribbing. I say « mimic » because this fabric doesn’t have the stretch a knitted ribbing or a ribbing worked in single crochet through the back loop only has. However, it’s a useful stitch pattern to know.The variations are, of course, endless – or almost – but here is one:
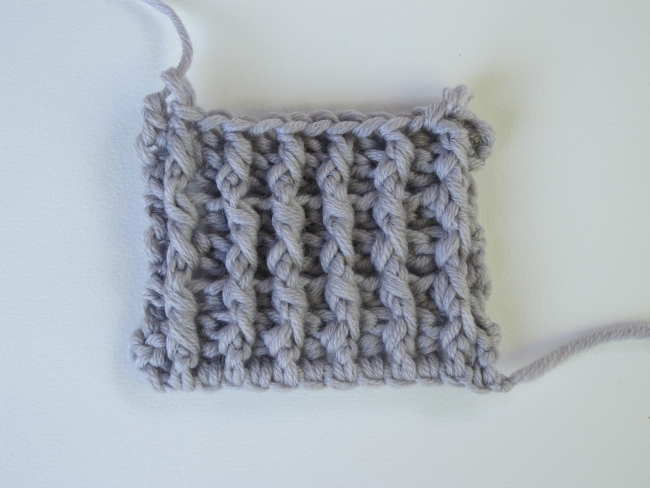 Chain a multiple of 2 + 1 (that is only another way to say « an odd number of stitches »). Work a row of dc to establish a foundation for your stitch pattern.Row 2: 1 dc in first st, (1 FPdc in next st, 1 BPdc in next st) until 2 sts remain at end of row. 1 FPdc in next st, 1 dc in last st.On every row from row 3 on, look at your work. The first and last st in every row is a normal dc (selvedge st). You should work the stitches between them as they appear. Normally, on row 3, the stitch in the row below after the selvedge stitch looks like a BPdc. You work a BPdc around this stitch. The next one looks like a FPdc, so you work a FPdc, and so on.Do not hesitate to count your stitches after each row, to make sure you are not increasing or decreasing inadvertently. In this stitch pattern I personally find it particularly easy to skip the last pattern stitch in the row, just before the selvedge stitch.You can manage the turning chain for the selvedge stitch at the beginning of each row any way you like. Turning chains were discussed in the newsletter for July 2009. In my swatch, I chose to practice the technique presented in the newsletter for February 2012.Another very common use of post stitches is for crocheted cables. To be totally honest, there was a time when I thought knitted cables were the only way to go if you wanted cables. However, I’m reconsidering that opinion. I have seen a lot of lovely crocheted cables lately. This is a narrow, simple one, a good training piece before you decide to tackle a large, impressive cable.
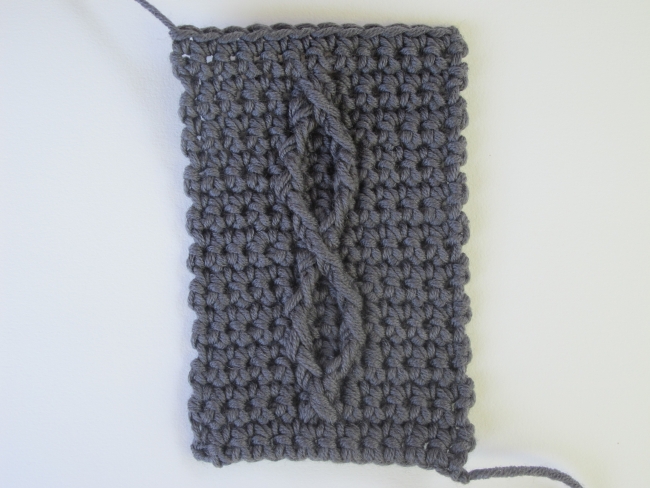 The cable is worked with post dc’s (all FPdc’s, since they are all worked from the right side) on a background of sc. When working the post sts, you work around the sc two rows below – that is, not in the previous row but the one just below that. Take care to skip the stitch behind the post stitch, or you will increase the number of sts in the row.This is the chart symbol for a FPdc (it’s red here only to be more visible, it can be any colour of course):
 And this is the stitch diagram for the cable swatch (written instructions below). The first row is on the wrong side of the work
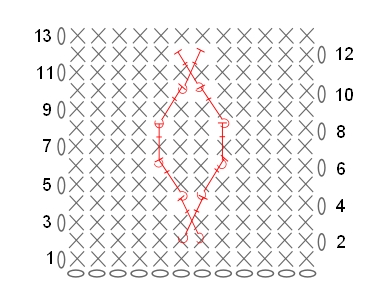 Ch 12 + 1 = 13.Row 1 (WS): 1 sc in 2nd ch from hook and in each ch to end of row (12 sts).Rows 2 – 3: Ch 1, 1 sc in each st to end of row.Row 4: Ch 1 , 1 sc in each of first 5 sts, 1 FPdc around 7th sc two rows below, 1 FP dc around 6th sc two rows below, 1 sc in each of last 5 sts. (The FPdc’s placed in the center of the row cross each other.)Row 5 and all odd-numbered rows: Ch 1, 1 sc in each st to end of row.Rows 6 and 8: Ch 1, 1 sc in each of first 4 sts, 1 FPdc around first FPdc two rows below, 1 sc in each of next 2 sts, 1 FPdc around second FPdc two rows below, 1 sc in each of last 4 sts.Row 10: Ch 1 , 1 sc in each of first 5 sts, 1 FPdc around first FPdc two rows below, 1 FPdc around second FPdc two rows below, 1 sc in each of last 5 sts.Row 12: Ch 1 , 1 sc in each of first 5 sts, 1 FPdc around second FPdc two rows below, 1 FPdc around first FPdc two rows below, 1 sc in each of last 5 sts. (Again, the FPdc’s placed in the center of the row cross each other.)Repeat rows 5 to 12 at will.Ribbing and cables are both quite traditional uses of post stitches. However, a few years ago, I was made aware of the possibility of integrating post stitches in openwork patterns. The design that prompted my awareness was the jacket Short and Sweet, designed by Angela Best and published in the book Stitch ‘n Bitch Crochet – The Happy Hooker by Debbie Stoller.Using post stitches in lacier stitch patterns makes it possible to give these patterns a more textured look, with more punch. Also, in this context, post stitches can be used without creating a thick fabric. Below is a swatch in which an openwork shell pattern has been used, simply replacing the vertical dc’s with a mix of FPdc’s and FPtr’s.
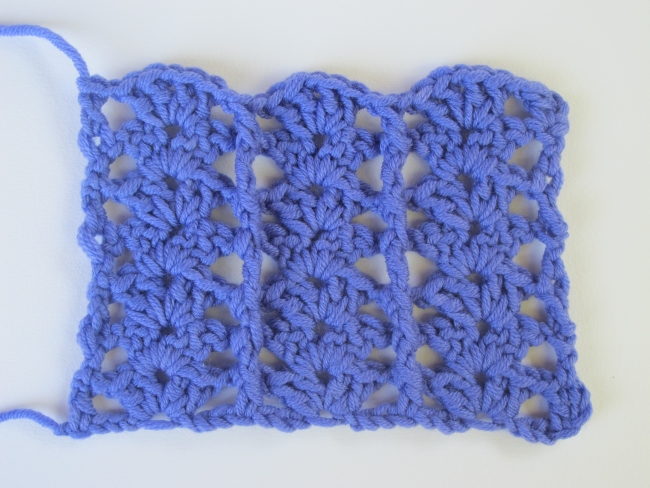 I am sure there is potential in the mix of openwork and post stitches to create many, many interesting stitch patterns. Why don’t you try?Note: All swatches in this newsletter were worked using my worsted weight merino yarn and a 5 mm (US H-8) hook.See you soon!