
Newsletter March 2014: Reading crochet charts (part 2)In the shop:I’m glad to introduce my own latest design: the tapestry crochet cowl Oona.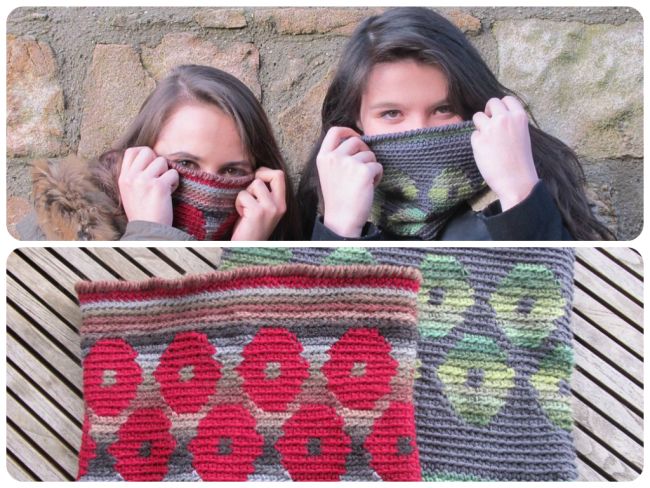 I worked the two cowls in Mochi Plus and worsted weight merino, using the Mochi Plus in the background on the red/brown one and in the pattern on the green/grey one.Many links are included in the pattern, but if you need a quick brush-up on tapestry crochet basics, you can check out my newsletters from June and August 2013.More information in the shop.For the knitters, EclatDuSoleil has dreamed up a third yak down shawl: Triplet.
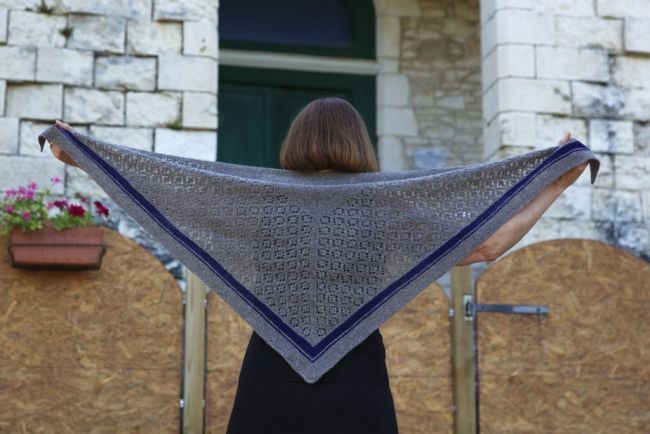 This time, she pairs the fluffy garter stitch with an Estonian « cat paw » lace pattern. The natural-coloured yak down is complemented by the stripes of contrasting laceweight wool in the border.More information in the shop. Several new colours of laceweight linen have arrived…
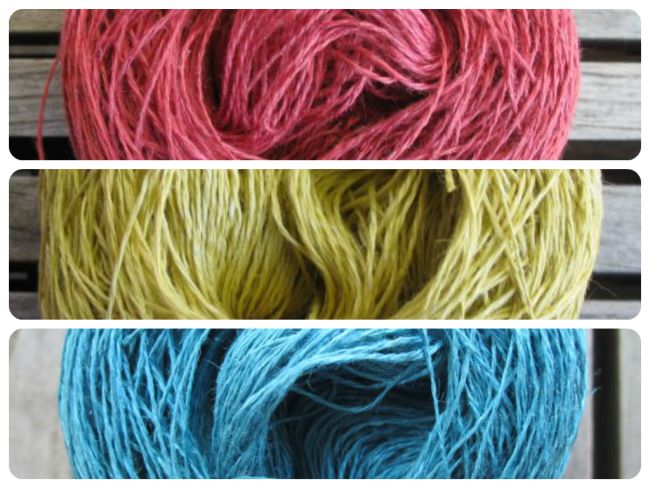 … and I’m now also selling Hiya Hiya’s fixed circular knitting needles.
 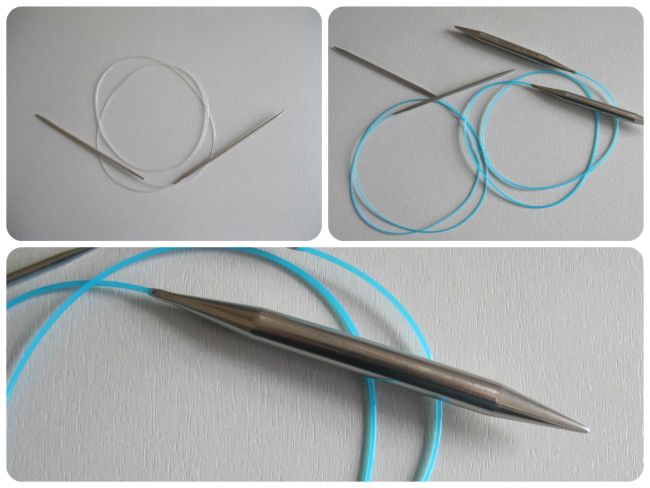 Elsewhere:
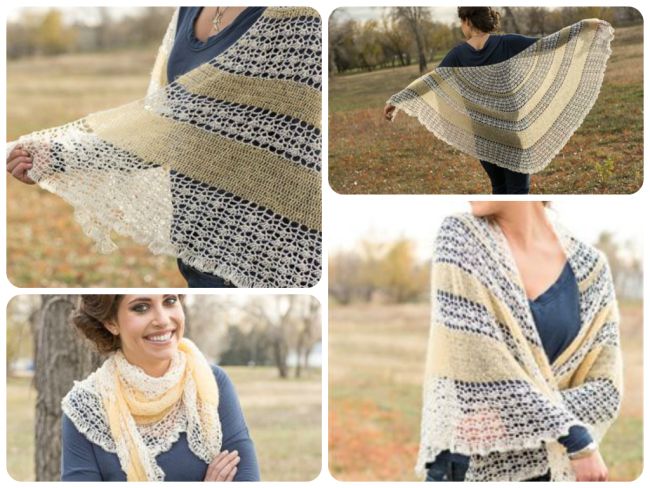 My shawl design Buttercream, based on the contrast between linen and mohair, was published in the spring issue of Interweave Crochet. It has been very well received – I’m happy and proud! Interweave organizes an official Buttercream CAL – you can find the forum thread here.Reading crochet charts (part 2)Last month’s topic was charts for stitch patterns worked flat, in rows – so, very naturally, this month’s topic is charts for motifs worked in the round!Just like last time, my explanations will be for right-handed crocheters, just as in nearly all published charts. Left-handed crocheters will need to flip things over.And like last time, we will take it step by step, so as not to be confused by an entire chart.Two preliminary remarks for motifs worked in the round and their charts: 1. When working flat, there are two ways to treat the turning chain for stitches taller than the sc – counting the turning chain as a stitch, or not. In motifs, where nothing can be hidden in a seam or border and the start of the round sits in the middle of the piece, these turning chains count as stitches.2. A crochet pattern worked in the round starts in the middle. Perhaps there are exceptions to this, but they are few and far between!Now, let’s start!
 This motif starts with a ring of chains. To know the number of chains, simply count the number of ovals. Here there are 10. Sometimes this number will be indicated, sometimes not (numbers larger than 5 or 7 are often indicated). If there are numbers in your chart, be careful not to confuse them. Some may indicate the round number, others the number of stitches in a specific section.When the motif starts with an adjustable loop, different symbols can be used.
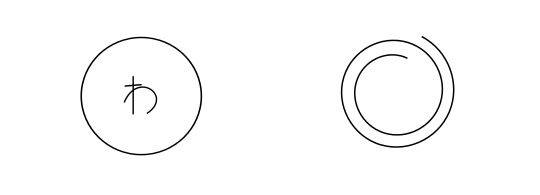 In Japanese charts the symbol for the adjustable loop will look something like the one on the left (I’m sorry if the character in the center is wrong, I can only crochet in Japanese, not write the language!). In US and European charts you often see some kind of variation of the symbol on the right, or a simple ring.But let’s get back to our own motif. The black dot in the chart above indicates the slip stitch that closes the starting chain to a ring. Here is the result:
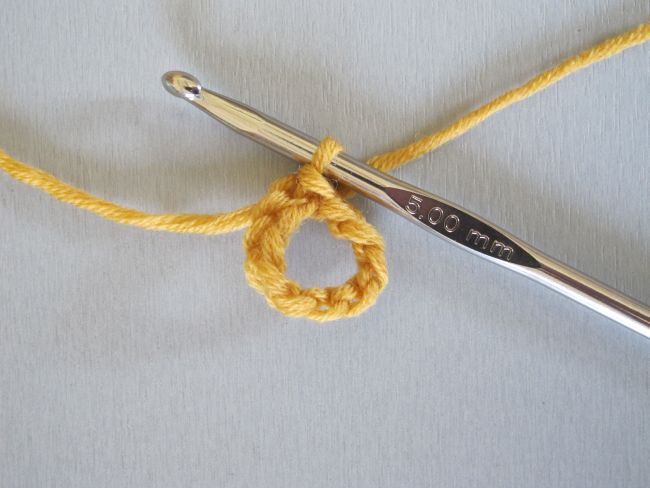 We are now going to start the first round.
 The round starts with a chain and a sc worked in the ring (all stitches on the first round are worked in the ring and not into the individual stitches in the ring).
 Note (which has nothing to do with the chart): I try to work this first stitch in the first round around the slip knot at the beginning of the starting chain. Enclosing the slip knot in this stitch will give the center of the motif a more even appearance, and it will not distort the size of the ring or bother you at the end of the first round. Also, whenever possible, I work the first round of the motif holding my yarn end along the starting ring and enclosing it in the stitches. It makes for one end less to weave in when you’re finished!
 We work the entire first round. There are 16 sc in the first round. The chain at the beginning of the round does not count as a st, and the slip stitch that closes the round is placed in the first sc, to make for a tidy beginning of the next round.
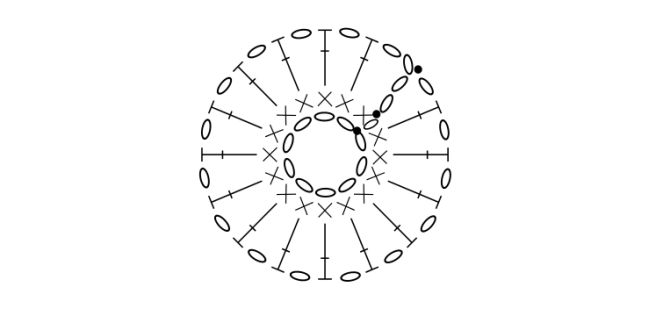
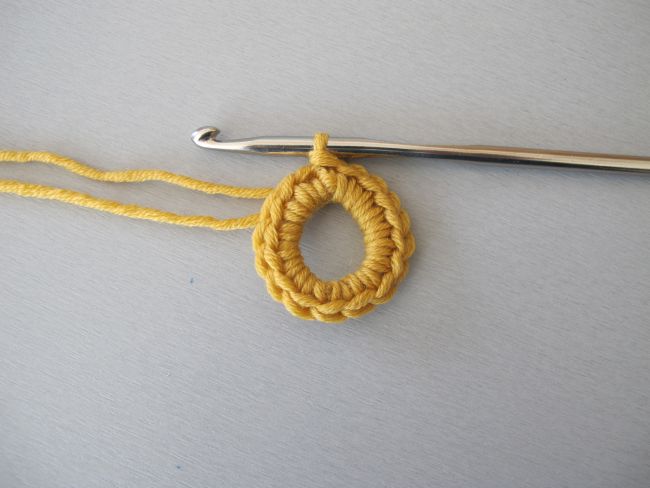 Round 2 is a round of dc’s, separated by 1-ch spaces. To start the round, we work 4 ch that count as 1 dc + 1 ch, and 1 dc in the second stitch of the round below.
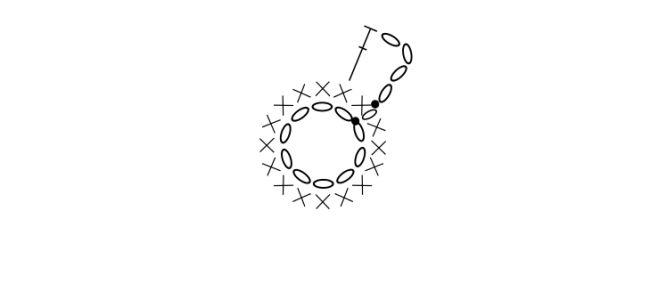 As always when working in the round, be careful to place the first « real » stitch in the right stitch below (here, the second one). Check where your slip stitch is placed – this is the first stitch in the round. Visually, it’s easy to get lost, since the slip stitch doesn’t take up much space in the first stitch in the previous round, and the starting chain seems to emerge to the right of this stitch. If needed, count the stitches in the previous round (without including the slip stitch) and double check. Inadvertently adding a stitch is very common when working in the round.
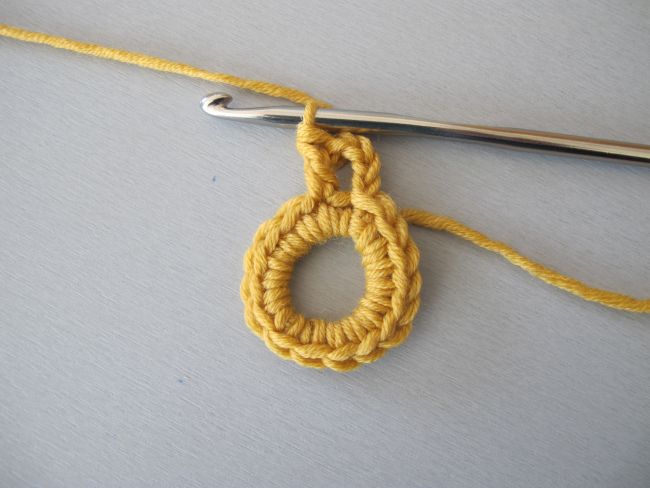
 Continue your round. Take extra care at the end of the round – this is another place where it is easy to accidentally add a stitch. The stitch at the bottom arrow is the slip stitch that closed the previous round – do not work into it!
 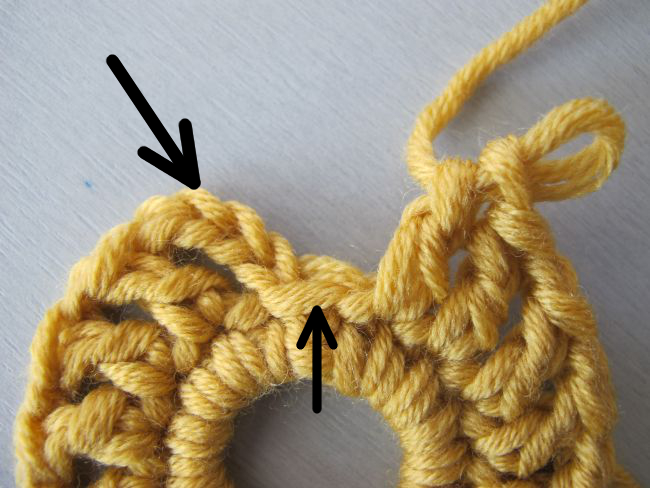 You also need to spot the right chain to join your round. Here, it is the third ch at the beginning of the round (the last of the 3 first ch that count as a dc). The arrow at the top left points to this chain. And do not forget the last ch in the round you’re working!
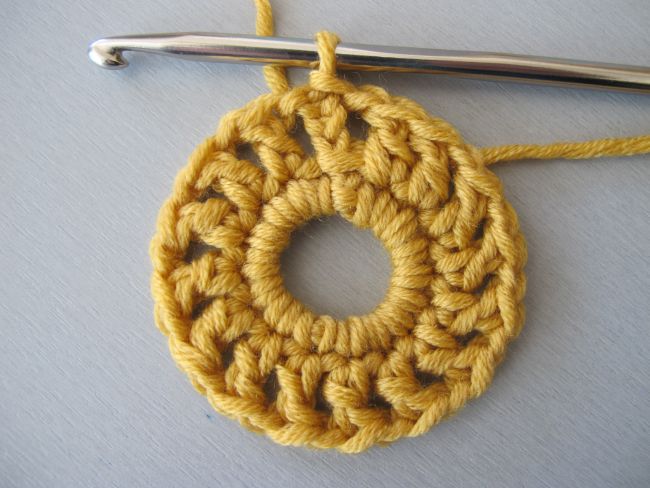 We will now add round 3.
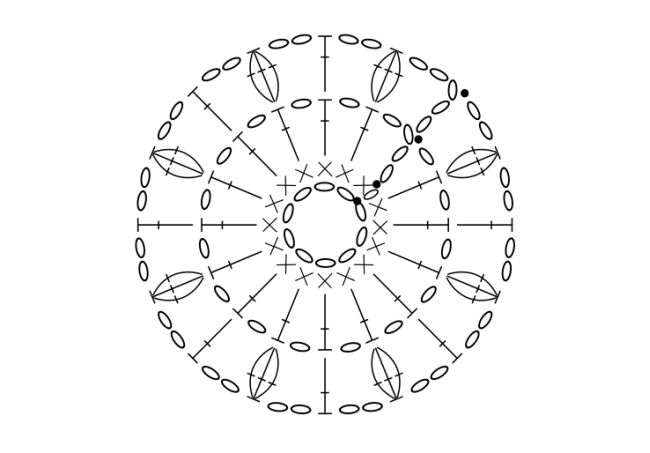 In this round, we find a new symbol which looks like this:
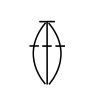 If we look carefully at this symbol, we can see that it is made up of three dc symbols. They all meet at the bottom, where they point towards the same stitch, and at the top, where they are united by a single horizontal bar.This means that the stitch is made from 3 dc’s worked together, inserting the hook in the same stitch for all 3. In other words, a 3-dc cluster, sometimes called a 3-dc bobble.Very often, by looking carefully at the symbol this way and trying to see how it’s built up, you can decipher more complex stitch symbols.
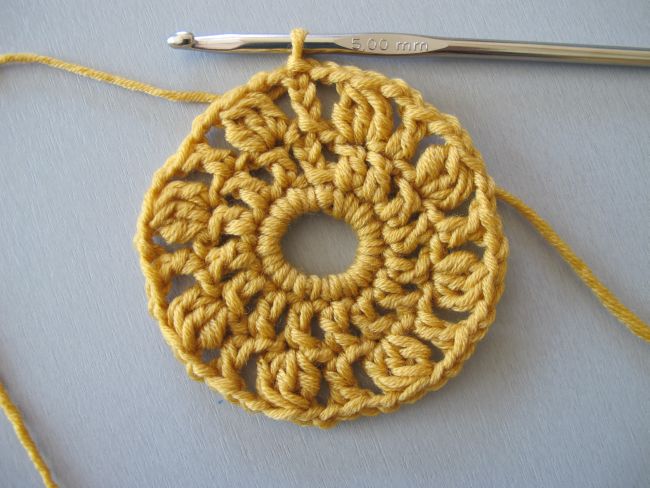 On to the final round:
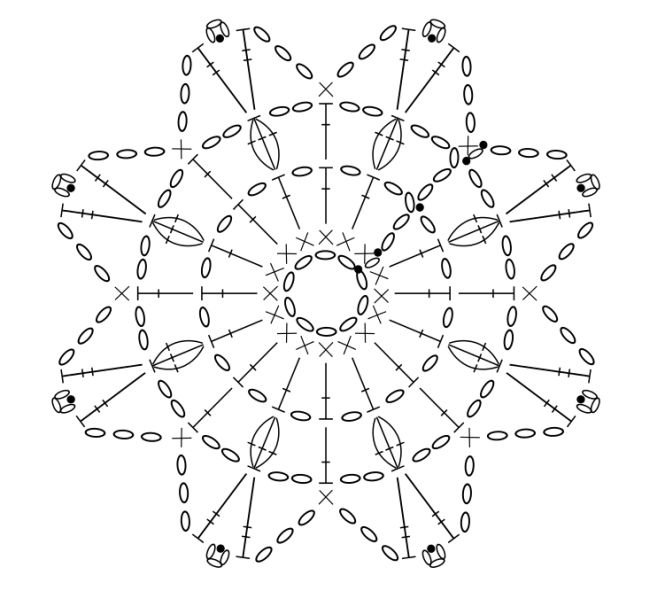 Here, we recognize the treble, the symbol that looks like a dc with an extra horizontal bar in the middle (see newsletter for January 2014). But what is that funny little symbol between each pair of trebles? Three chains that are kind of rolled up and a slip stitch … a picot! Sometimes the picot symbol is slightly tilted, to mimic more closely how the stitch sits in the actual work; sometimes it is shown straight, as here.Some picots are made with a sc instead of the slip stitch (this gives more body to the picot). In those cases, of course, the black dot is replaced by the sc symbol.Here is the final result, with ends woven in, after a light blocking.
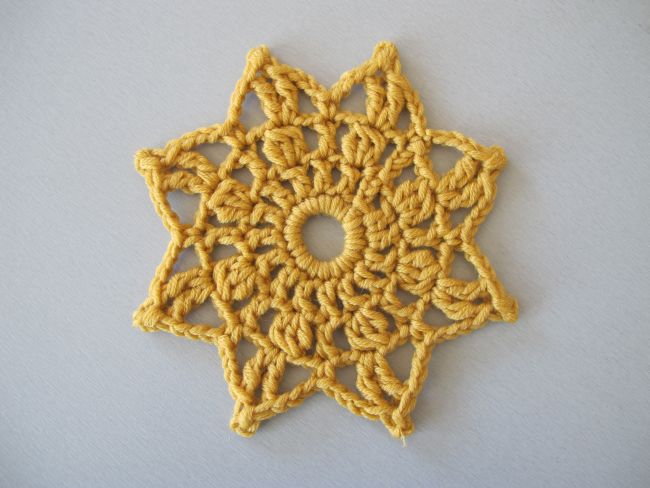 Designed for educational purposes only, but I must admit that I like it!I hope these three newsletters on charts have been helpful to you. There is much more to say about charts and reading them, and I will most certainly come back to the topic – but I think the foundation is now laid.If you have comments, questions or suggestions, e-mail me!The motif in this newsletter was madewith worsted weight merino and a 5 mm hook.See you soon!
 Newsletter index