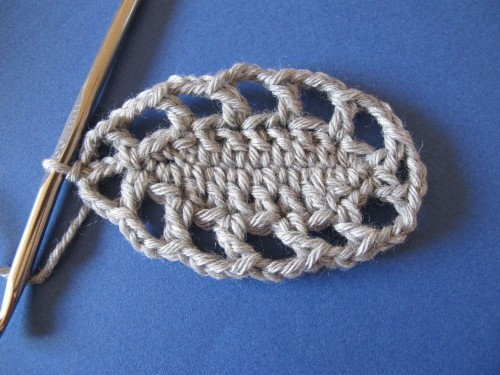
Cette deuxième étape sera plus facile à faire juste du premier coup en faisant bien la différence entre les mailles serrées et les brides du tour précédent.
This second step will be easier to get right from the start if you are careful with which stitches are sc and which are dc in the previous round.
Det här steget blir lättare att få rätt från början om du har koll på skillnaden mellan fasta maskor och stolpar i föregående varv.
Tour 2 : 6 ml (comptent pour 1 br + 3 ml), 1 br dans la même m que la mc, 3 ml, sauter 1 ms, 1 br dans la br suivante, *3 ml, sauter 1 br, 1 br dans la br suivante*, répéter de * à * encore 2 fois, 3 ml, sauter 1 ms, (1 br, 3 ml, 1 br) dans la ms suivante, 3 ml, sauter 1 ms, 1 br dans la br suivante, *3 ml, sauter 1 br, 1 br dans la br suivante*, répéter de * à * encore 2 fois, 3 ml, 1 br à la base des 3 ml du début du tour précédent, 3 ml, 1 mc dans la 3ème ml du début du tour précédent.
Round 2: Ch 6 (count as 1 dc + 3 ch), 1 dc in same stitch as previous sl st, ch 3, skip 1 sc, 1 dc in next dc, *ch 3, skip 1 dc, 1 dc in next dc*, repeat from * to * twice more, ch 3, skip 1 sc, (1 dc, ch 3, 1 dc) in next sc, ch 3, skip 1 sc, 1 dc in next dc, *ch 3, skip 1 dc, 1 dc in next dc*, repeat from * to * twice more, ch 3, 1 dc at the base of the 3 ch at the beginning of previous round, ch 3, 1 sl st in 3rd ch at the beginning of the previous round.
Varv 2 : 6 lm (räknas som 1 st + 3 lm), 1 st i samma m som föregående sm, 3 lm, hoppa över 1 fm, 1 st i nästa st, *3 lm, hoppa över 1 st, 1 st i nästa st*, upprepa från * till * 2 ggr till, 3 lm, hoppa över 1 fm, (1 st, 3 lm, 1 st) i nästa fm, 3 lm, hoppa över 1 fm, 1 st i nästa st, *3 lm, hoppa över 1 st, 1 st i nästa st*, upprepa från * till * 2 ggr till, 3 lm, 1 st precis under den 1:a lm i de 3 lm i början av föregående varv, 3 lm, 1 sm i 3:dje lm i början av föregående varv.
See you tomorrow!
Vi ses imorgon!


sympa comme tout…..;)
I would like an answer please to something I have often wondered about.
In the last step, what is the preferred way to do a stitch in a ch? Sometimes I struggle to insert the hook under the V and over the back spine(?) of the chain stitch. But for ease, I often just insert the hook into the top part of the V. Thanks.
Dear Kristina,
My preferred way of doing this is tho insert the hook under the top leg of the V and the bump of the back bone (as your first suggestion). If I insert the hook into the just the top part of the V (one strand), I tend to get a hole, due to the stretch put on the single strand. Same thing when I work into a base chain.
However, if you struggle to get the hook under both the top leg of the V and the bump, it might be that your chains are tight. In this case, you might not get a hole when working under a single strand of the V, provided that the chain is tight enough.
So, it depends on how you crochet. Observe your work – if you get holes when stitching into a ch, and you want to avoid that look, try working under both top leg of V and bump. To be able to do this, you might need to work looser chains, which entails some concentration to start with (it gets automatic after a while, I’ve tried !).
But if your work looks fine when working just under one strand in the chain, there is no need at all to do otherwise !
Annette
Thanks, Annette. That helps very much and is good to know.