
Exploring the « baktus »
This is the third newsletter about shawl shapes. The previous ones discussed triangles and half circles.
The shapes discussed so far have been worked either top down or bottom up. But I couldn’t leave this topic without discussing shawls worked side to side, a shape sometimes called a baktus. The name can be traced back to this pattern, published on Ravelry in 2008 by a Norwegian designer.
A baktus is a shape worked from side to side. Typically, it is worked in three sections. In section 1, starting at the tip, increases are worked at one edge (= the bottom edge), creating a more or less triangular shape. Section 2 is worked straight, and in section 3 decreases are applied to the bottom edge until you reach the other tip.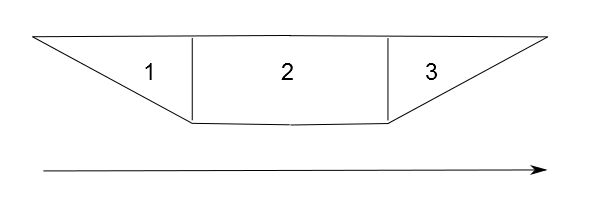 This construction technique works very well in crochet. It is a simple way to obtain the now so popular elongated shawl shapes, which are mostly (but not exclusively) worn around the neck. But the baktus can be used to work many different shapes, and opens up plenty of creative possibilities.
If you want inspiration (or a pattern!), have a look at shawls like Corolle or Solveig, designed by EclatDuSoleil. They are very different, but both are constructed like baktuses.
Here, I have had some fun exploring the baktus construction and using it to obtain different shapes.
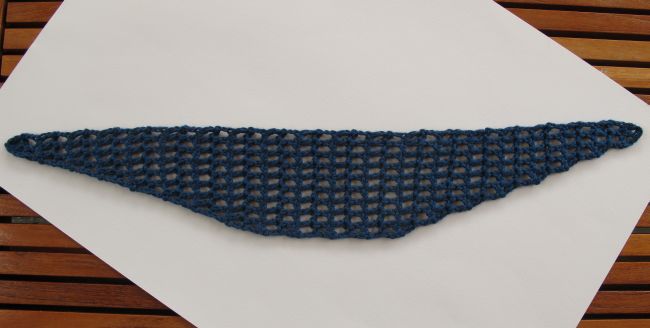
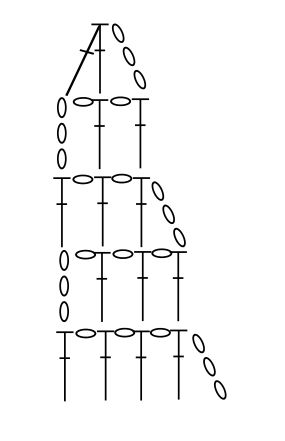
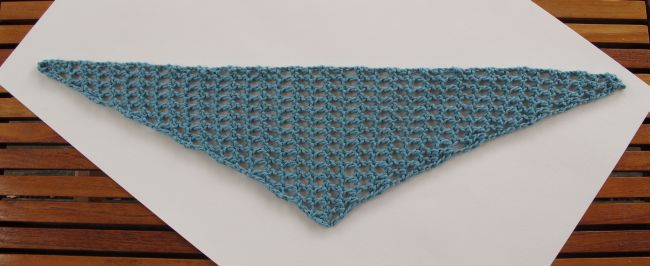
1. Crescent
Following up on last month’s newsletter on half circle shawls, I wanted to use the baktus shape to create an elongated crescent.
In this example, I increased (in section 1) and decreased (in section 3) every second row.
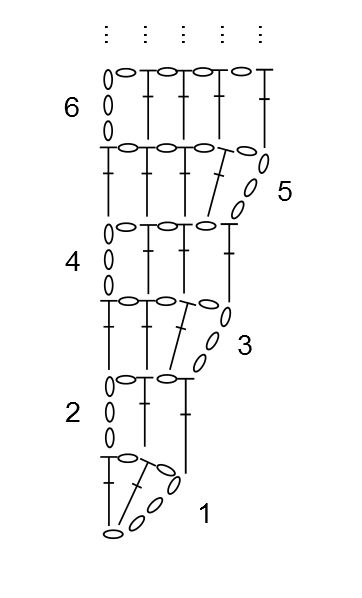
Section 1:
Row 1 (RS): Ch 5 (counts as 1 ch + 1 dc + 1 ch), (1 dc, ch 1, 1 dc) in 5th ch from hook. — 3 dc and 2 ch spaces.
Row 2: Ch 4 (counts as 1 dc + 1 ch), 1 dc in next dc, ch 1, 1 dc in 3rd ch at beginning of previous row.
Row 3: Ch 4 (counts as 1 dc + 1 ch), 1 dc in first ch space, ch 1, 1 dc in next dc, ch 1, 1 dc in 3rd ch at beginning of previous row. — 4 dc and 3 ch spaces. (1 dc increased)
Row 4: Ch 4 (counts as 1 dc + 1 ch), [1 dc in next dc, ch 1] twice, 1 dc in 3rd ch at beginning of previous row.
Row 5: Ch 4 (counts as 1 dc + 1 ch), 1 dc in first ch space, [ch 1, 1 dc in next dc] to end of row; finish with ch 1, 1 dc in 3rd ch at beginning of previous row. (1 dc increased)
Row 6: Ch 4 (counts as 1 dc + 1 ch), [1 dc in next dc, ch 1] to end of row; finish with ch 1, 1 dc in 3rd ch at beginning of previous row.
Repeat rows 5 and 6 to desired length and height.
Section 2: Work all rows like row 6 in section 1.
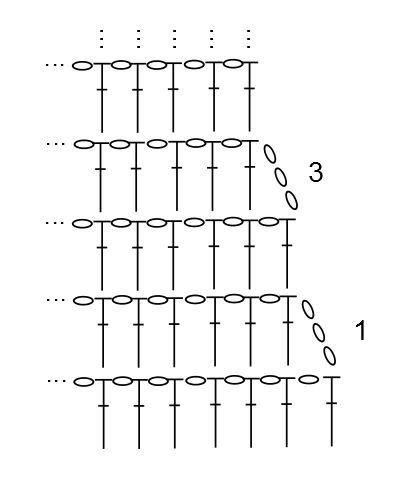
Section 3:
Row 1 (RS): Ch 3 (does not count as a st), skip first ch space, [1 dc in next dc, ch 1] to end of row; finish with 1 dc in 3rd ch at beginning of previous row. (1 dc decreased)
Row 2: Ch 4 (counts as 1 dc + 1 ch), [1 dc in next dc, ch 1] to end of row; finish with 1 dc in first dc in previous row.
Repeat rows 1 and 2. Work the very last rows as follows:
Last row (RS): When there are only 3 dc left, and on next RS row, ch 3 (does not count as a st), dc2tog inserting your hook first in next dc and then in 3rd ch at beginning of previous row.
Fasten off.
2. Elongated triangle
This baktus has only two sections – there is no middle worked straight.
I wanted to create a steeper increase than for the crescent, so I increased on 2 rows out of 3.
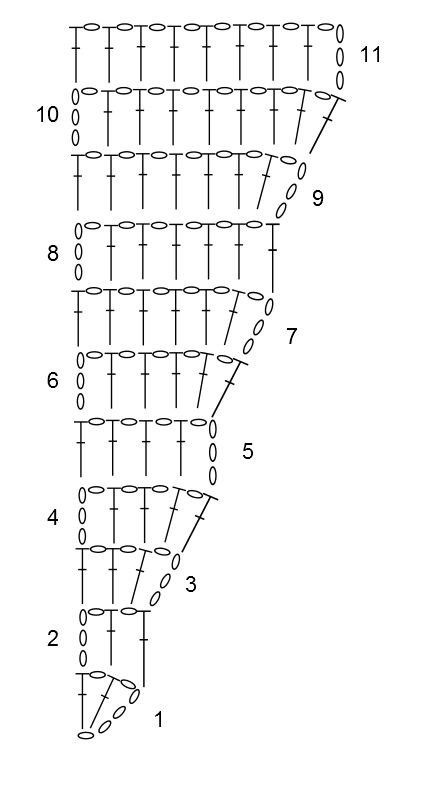
Section 1:
Row 1 (RS): Ch 5 (counts as 1 ch + 1 dc + 1 ch), (1 dc, ch 1, 1 dc) in 5th ch from hook. — 3 dc and 2 ch spaces.
Row 2: Ch 4 (counts as 1 dc + 1 ch), 1 dc in next dc, ch 1, 1 dc in 3rd ch at beginning of previous row.
Row 3: Ch 4 (counts as 1 dc + 1 ch), 1 dc in first ch space, ch 1, 1 dc in next dc, ch 1, 1 dc in 3rd ch at beginning of previous row. — 4 dc and 3 ch spaces. (1 dc increased)
Row 4: Ch 4 (counts as 1 dc + 1 ch), [1 dc in next dc, ch 1] twice, 1 dc in ch space, ch 1, 1 dc in 3rd ch at beginning of previous row. — 5 dc and 4 ch spaces. (1 dc increased)
Row 5: Ch 4 (counts as 1 dc + 1 ch), [1 dc in next dc, ch 1] to end of row; finish with 1 dc in 3rd ch at beginning of previous row.
Row 6: Ch 4 (counts as 1 dc + 1 ch), [1 dc in next dc, ch 1] to last ch space, 1 dc in ch space, ch 1, 1 dc in 3rd ch at beginning of previous row. (1 dc increased)
Row 7: Ch 4 (counts as 1 dc + 1 ch), 1 dc in first ch space, [ch 1, 1 dc in next dc] to end of row, placing last dc in 3rd ch at beginning of previous row. (1 dc increased)
Row 8: As row 5.
Row 9: As row 7.
Row 10: As row 6.
Repeat rows 5 to 10 to desired length and height. Finish with a row 10.

Section 2:
The decreases start immediately after the last increase row, to shape the bottom tip of the triangle.
Row 1: Ch 3 (does not count as a st), [1 dc in next dc, ch 1] to end of row; finish with 1 dc in 3rd ch at beginning of previous row. (1 dc decreased)
Row 2: Ch 4 (counts as 1 dc + 1 ch), [1 dc in next dc, ch 1] until 2 dc remain at end of row, dc2tog in last 2 dc. (1 dc decreased)
Row 3: Ch 4 (counts as 1 dc + 1 ch), [1 dc in next dc, ch 1] to end of row; finish with 1 dc in 3rd ch at beginning of previous row.
Row 4: Ch 4 (counts as 1 dc + 1 ch), [1 dc in next dc, ch 1] until 1 dc + 4 ch remain at end of row, dc2tog inserting hook first in last dc and then in 3rd ch at beginning of previous row. (1 dc decreased)
Row 5: As row 1. (1 dc decreased)
Row 6: Ch 4 (counts as 1 dc + 1 ch), [1 dc in next dc, ch 1] to end of row; finish with 1 dc in last dc.Repeat rows 1 to 6 until only 3 dc remain.
Finish as for the crescent shape above.
3. Asymmetrical triangle
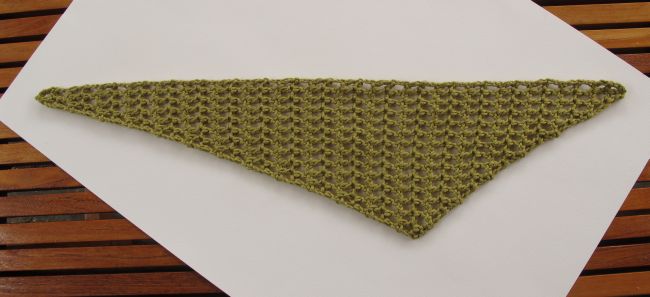
It is also easy to play with different increase rates in a baktus to create asymmetrical shapes. Here, I’ve made a triangle, but you can of course imagine other shapes endlessly.
Section 1:
Worked like section 1 of the crescent, only for more rows.
Just as for the elongated triangle, there is no middle section, and the last increase row is followed immediately by a decrease row, to shape the bottom tip of the triangle.
Section 2:
Repeat rows 1 and 2 in section 2 of the elongated triangle to create a steep slope. The last row is worked as for the shapes above.
Feel free to share your own baktus experiments in the comments below!
See you soon!
