
Sometimes things just come together. When working the swatches in last month’s newsletter, I really enjoyed the look the V-stitch pattern took on when worked in single-row stripes. A few days before working that swatch, I had pulled out three balls of yarn from my stash with the intention to make a simple cowl. I had tried out a knitted slip-stitch pattern, but I wasn’t very enthusiastic about it.
So I decided to make a crocheted cowl in V-stitches, using my three stash yarns. And why not make a newsletter from it? I decided that a « recipe » for making a simple cowl, applicable to any yarn and any stitch pattern, could be of interest to my subscribers – perhaps especially at a time of year when necks are cold and many people think about making gifts for the ones they love.
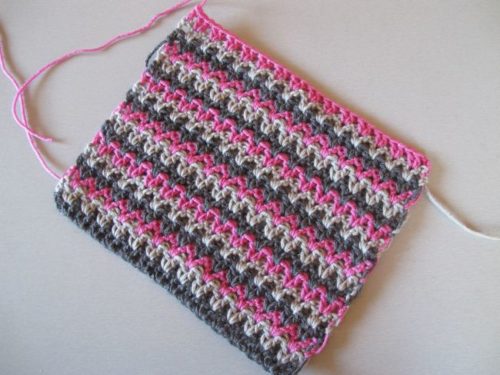
So here it comes! First, decide on yarns and stitch pattern. I used the three yarns I had pulled out of my stash. Two of them (the greys) were of the same weight, the third (the pink) a tiny bit lighter. I based my hook size on the two slightly heavier yarns and worked a swatch with a 4 mm hook. It turned out that the pink yarn behaved quite well and blended in nicely.
When I make an accessory, I tend to work my swatches over about 30 stitches. (For garments, it’s at least 40). You decide on your own swatch size, of course, but be aware that the larger the swatch, the more accurate the gauge. This is because the stitches at the edges of your swatch will almost always have a slightly different tension than the ones in the middle. To be able to calculate your gauge correctly, you will need to measure your swatch several stitches in from each edge.
Also, you can’t generally measure crochet swatches the same way you measure knitted swatches. When measuring a knitting gauge, you lay your tape measure or ruler on your swatch, mark out 10 cm (or 4″) with two pins, and count the number of stitches between the pins.
If you are crocheting anything other than solid dc’s, sc’s or hdc’s, this will almost never give a useful result with a crocheted swatch.
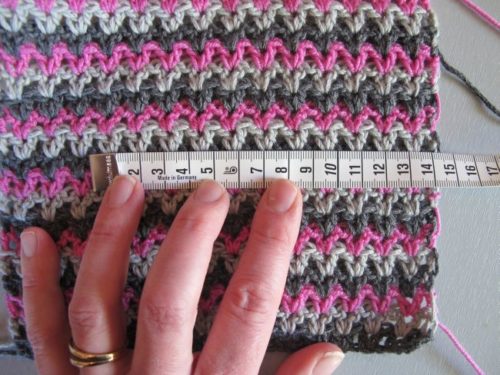
Instead, lay your tape measure or ruler on your swatch. Try to match up entire stitch repeats (here, entire V-stitches) with a measurement unit that makes sense. I work in metrics, so I try to match stitch repeats to centimeters – if you use inches, perhaps 1/2 inch can be a useful « unit ».
Here, it looks as though 9 cm is the measurement that matches up the closest with entire stitch repeats. I mark this distance with pins and count the number of stitch repeats between the pins.
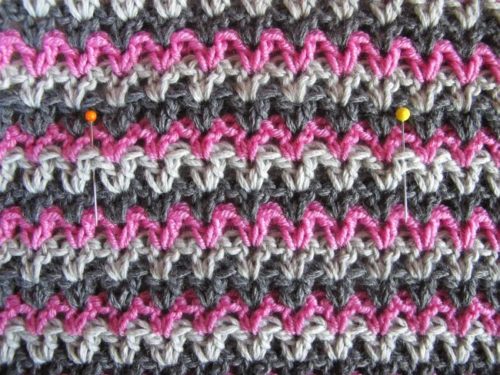
I have 7 V-stitches between my two pins, so my gauge is 7 V-stitches = 9 cm. Now, I need to decide on the circumference of my cowl. I could measure one I already own. However, I want a cowl that’s a little more fitted and close to my neck than the ones I already have, but that I can still pull on without flattening my hair more than necessary, wiping off all my makeup and pulling off my glasses. I measure the circumference of my head horizontally at the tip of my nose. This gives me an approximate measurement of 55 cm (we are not talking rocket science here!).
I will use this measurement and my gauge to calculate how many V-stitches I need for each round in my cowl.
7 V-stitches divided by 9 cm = approx 0.78 V-stitches per cm.
0.78 x 55 = 42.9. I round this up to 43 to get the number of V-stitches per round.
I worked my swatch flat, but I’m going to crochet my cowl in the round. In my swatch, I have two selvedge stitches, one at each edge. When working in the round, I will keep only one of these. It will serve as a « seam stitch » at the join of the round.
Let’s make a diagram of the stitch pattern.
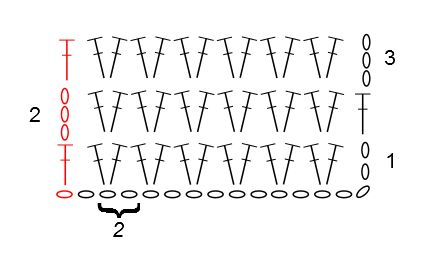
This is the diagram for the pattern worked flat. We can see that the stitch pattern is worked over a multiple of 2 + 1, to which we add 2 ch that count as the first dc in row 1. When I adapt this pattern to working in the round, I will subtract the stitches in red.
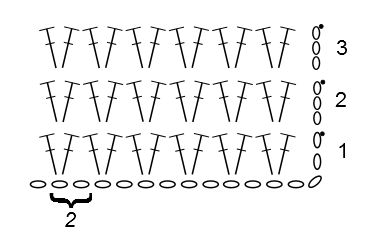
The resulting diagram shows a stitch pattern worked over a multiple of 2 stitches: every V-stitch equals 2 ch in the starting chain.
Since I want 43 V-stitches, I am going to chain 43 x 2 = 86, plus 2 chains to get to the edge, plus 2 more for the seam stitch = 90 sts.
I prefer working the first row before closing the round with a slip stitch. This leaves a small gap at the bottom of the first round, which is easily closed when weaving in the ends. Working the first row flat reduces the risk of twisting the starting chain, which easily happens if you close it before working the first round. (You will need to pay attention when closing the second round too, though).
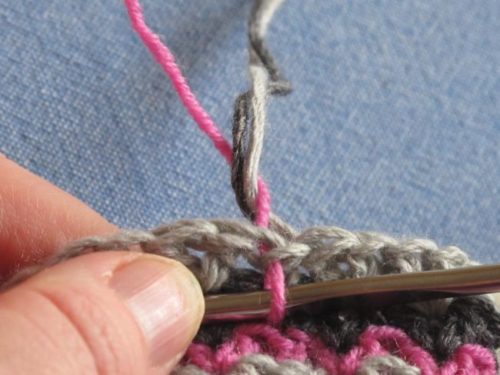
And then it’s just working a tube, closing each round with a slip stitch. If using several colours, work the slip stitch at the end of the round in the colour of the next round, and carry up the other colour(s) at the back of the « seam ».
This is how I twisted the unused colours around the colour of the next round, just after the final sl st of the previous round.
And this is how it looks on the back of the work.
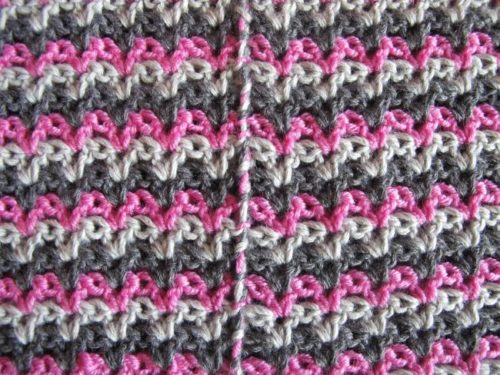
Tidy enough for a gift, in my humble opinion!
The cowl needs to be tall enough to allow for some « scrunch » or folds around the neck. However, since this simple cowl is just a tube, with no shaping for the shoulders, it shouldn’t be too tall either. I worked mine to a height of approximately 23 cm (9″). You should, of course, adapt this height to your own wishes.
To make a very warm and cozy cowl (and if you have the time, yarn and patience) you could also work to double the desired height, fold the tube so that it has two layers, and sew or crochet these two layers together at the bottom.
Since I didn’t double my cowl, I decided to edge it. I used simple sc, one row in each of the colours used in the cowl. You might question this choice since it makes for a slightly firmer edge, which needs to be blocked out so as not to pull in the borders of the cowl. In its favour, though, I must say it’s simple and looks nice, at least to me!
Alternative edgings could be crab stitch, shells, or a ruffle – it depends on what you want to do and what you think goes with the yarn and stitch pattern you’ve chosen.
Here’s a snapshot of the finished cowl.
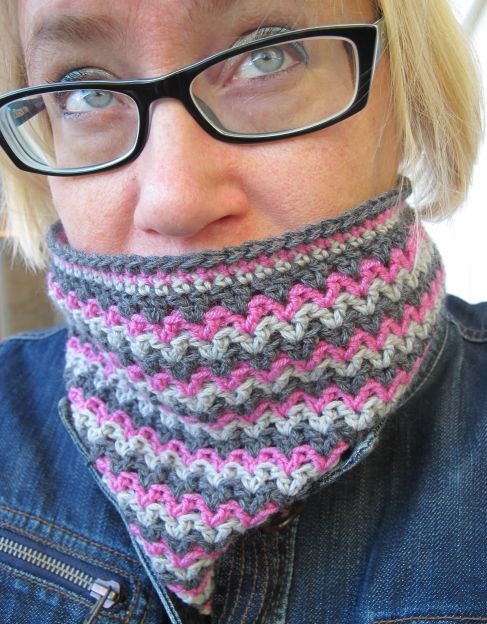
If you make one using this « recipe », I’d love to see it! Don’t hesitate to send me a picture.
See you soon!
