
In the shop:
For the knitters, a new pattern for kids designed by Laurence Bertolle: Pomme de reinette.
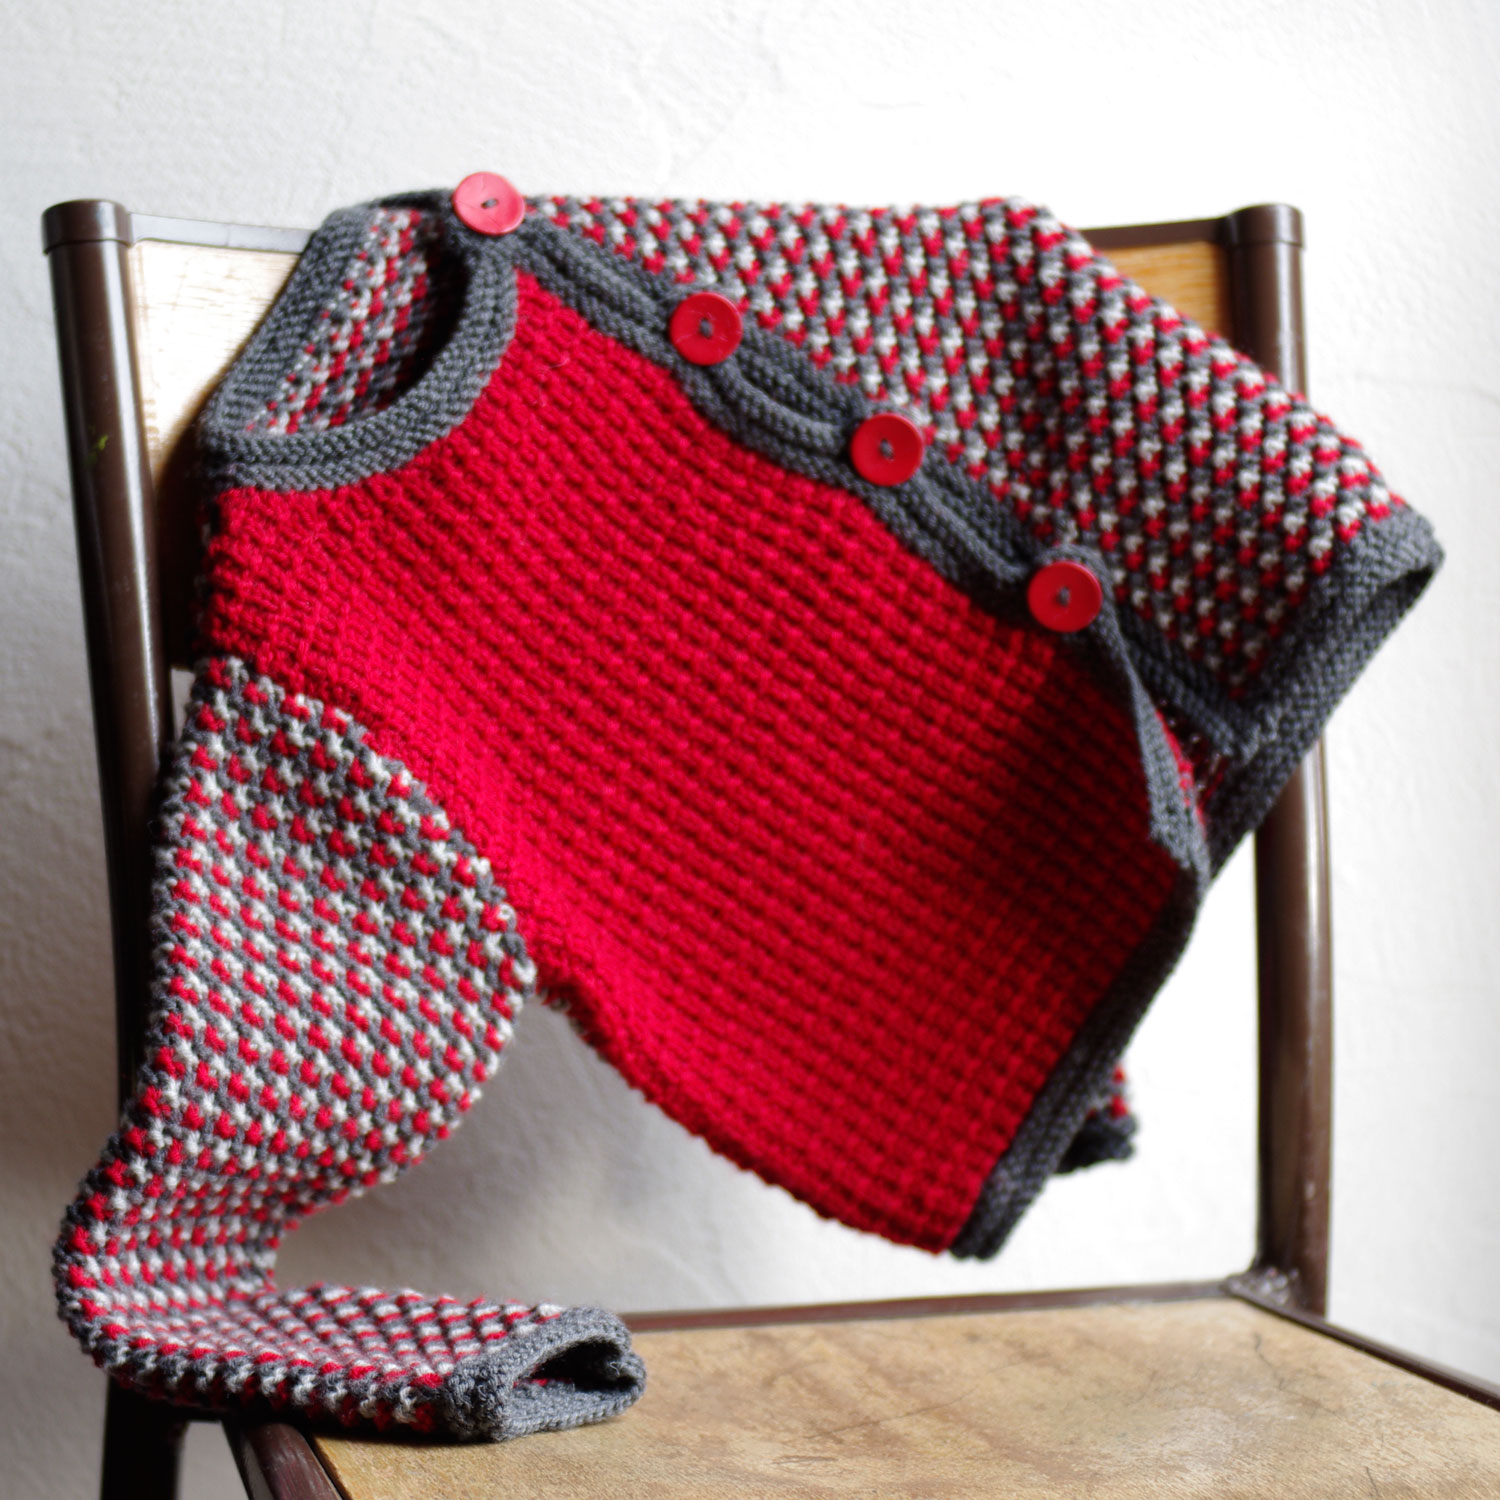
A pretty little jacket, worked in Merino DK, in sizes 2 to 8 yrs.
More information in the shop.
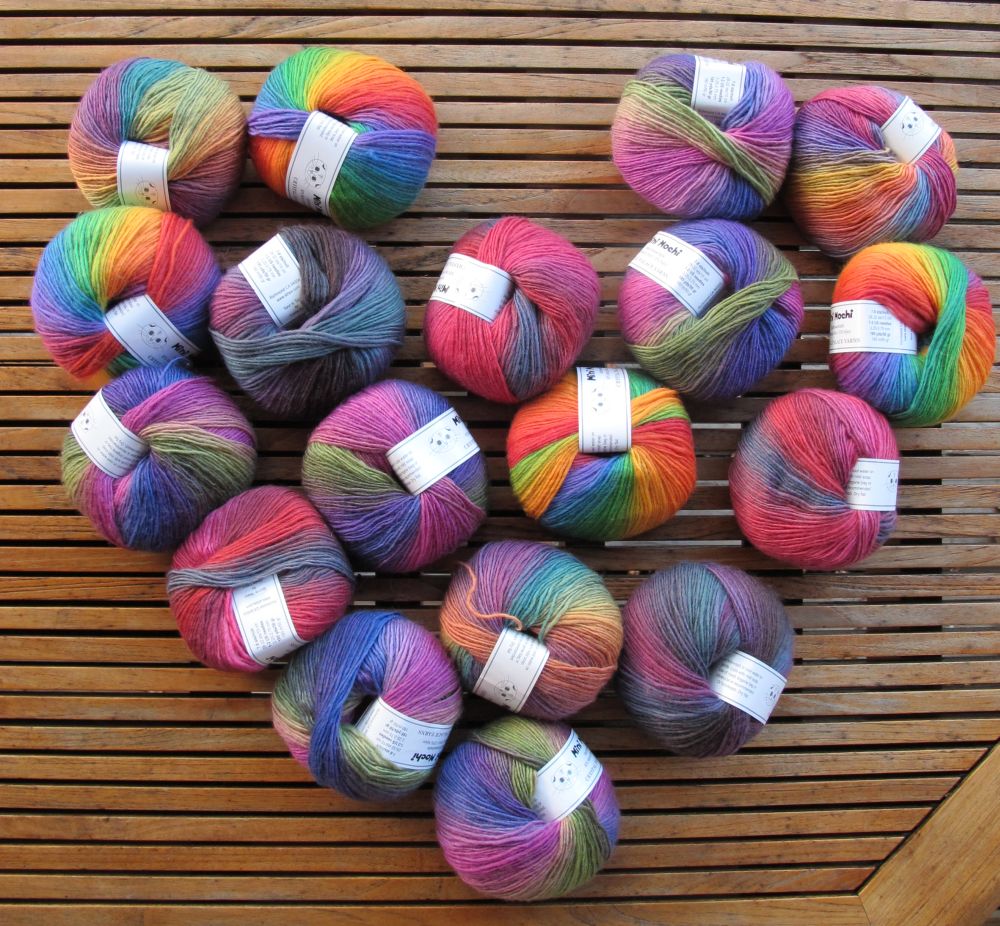
To work up Pomme de Reinette, or any other pattern (crocheted or knitted) in DK weight yarn, you can now choose among 11 colours of Merino DK:
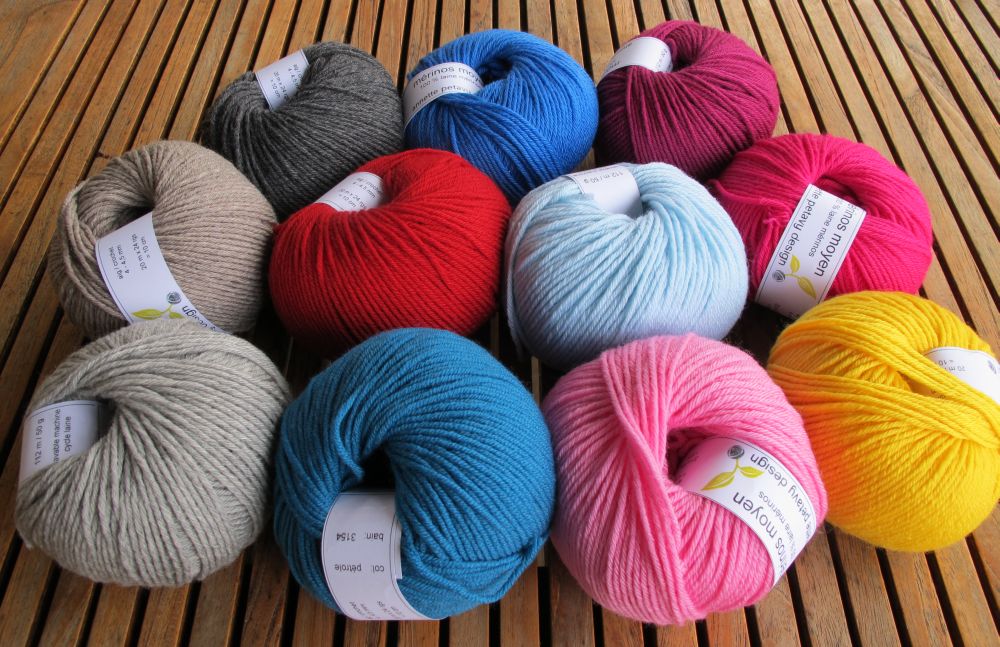
The colours oatmeal, light blue and rose are new.
If you decide to make Pomme de Reinette, you will also need 4 coloured coconut buttons:
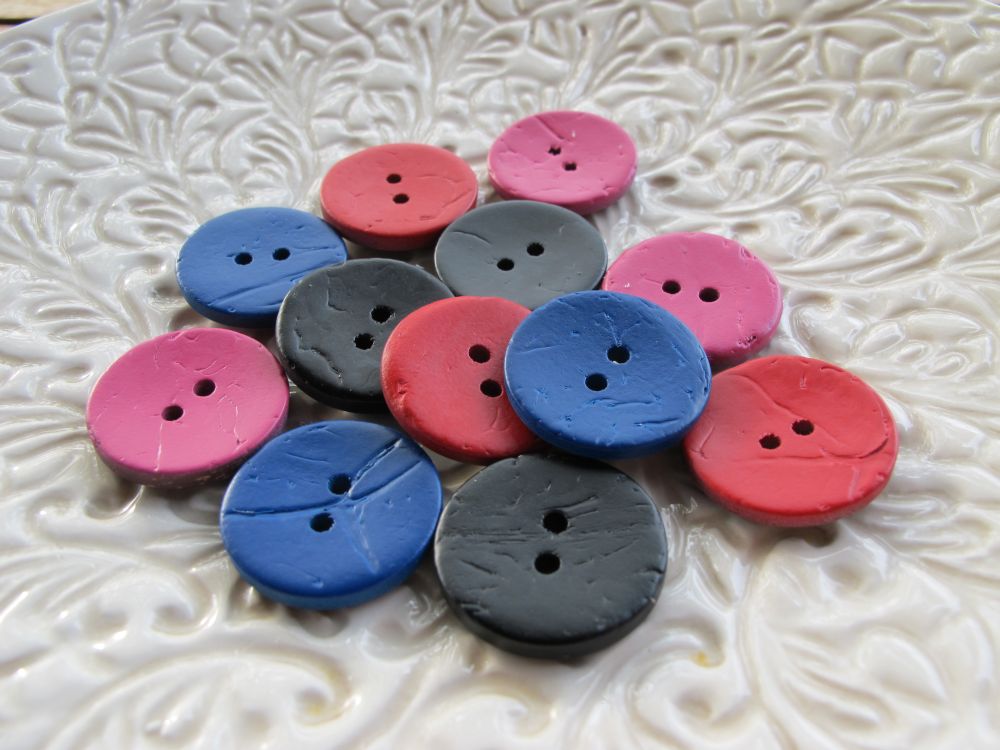
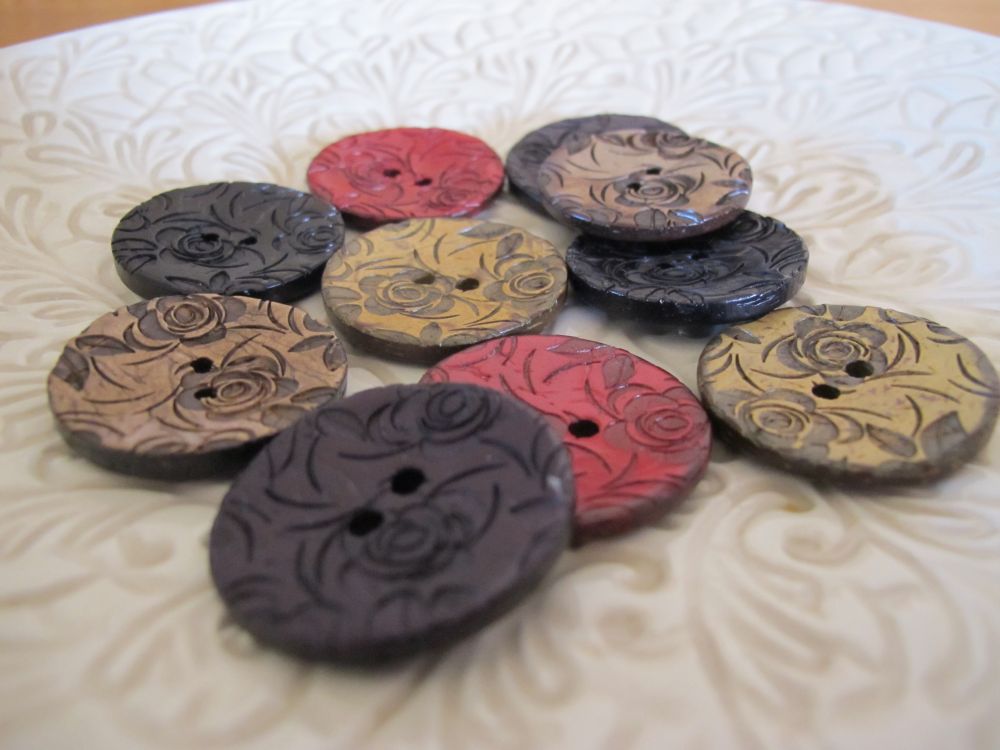
These are medium-sized (22 mm across). If you need larger buttons (30 mm) and enjoy the natural feel of coconut, you can now also choose between engraved buttons with gold or silver accents…

… and buttons in 5 different colours with a pretty flower motif:
On the blog:
![]() Do not miss the 2015 Advent Calendar – a mix of special offers and crochet projects inspired by Irish crochet.
Do not miss the 2015 Advent Calendar – a mix of special offers and crochet projects inspired by Irish crochet.
You can follow along on the blog (category « dec2015 ») or via the dedicated Facebook group.
Special offers will occur on the weekends, and start on Sunday November 29. The crochet projects will be shown step-by-step during the week, and start on Tuesday December 1.
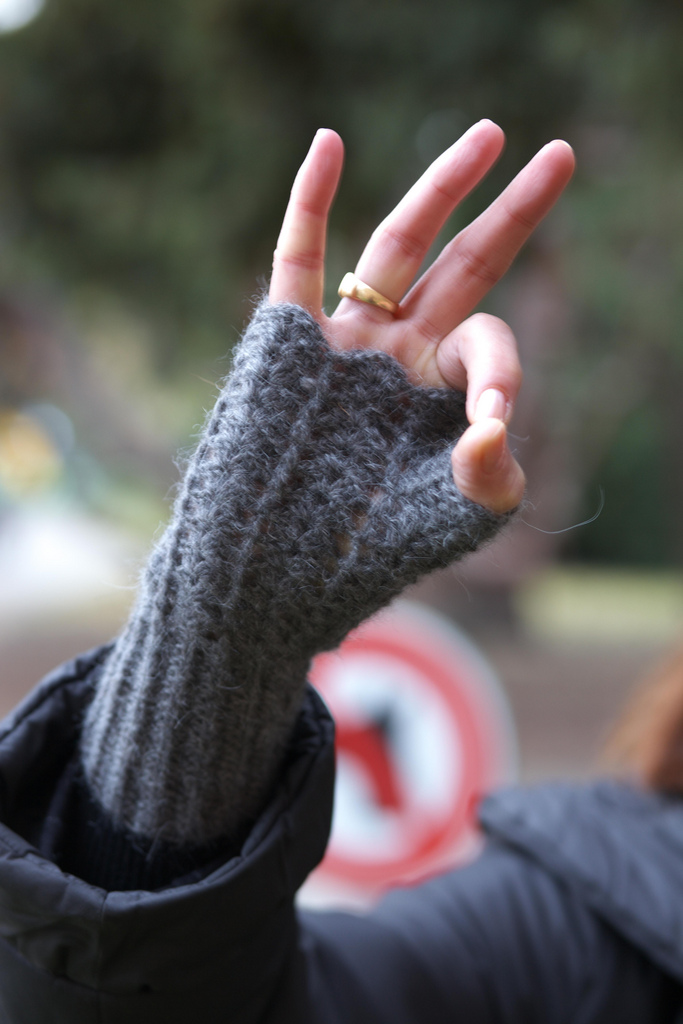
You might also want to check out the blog category « gift ideas » for small and quick projects. The photo shows one of the four versions of fingerless mittens included in EclatDuSoleil’s pattern Hot Little Hands.
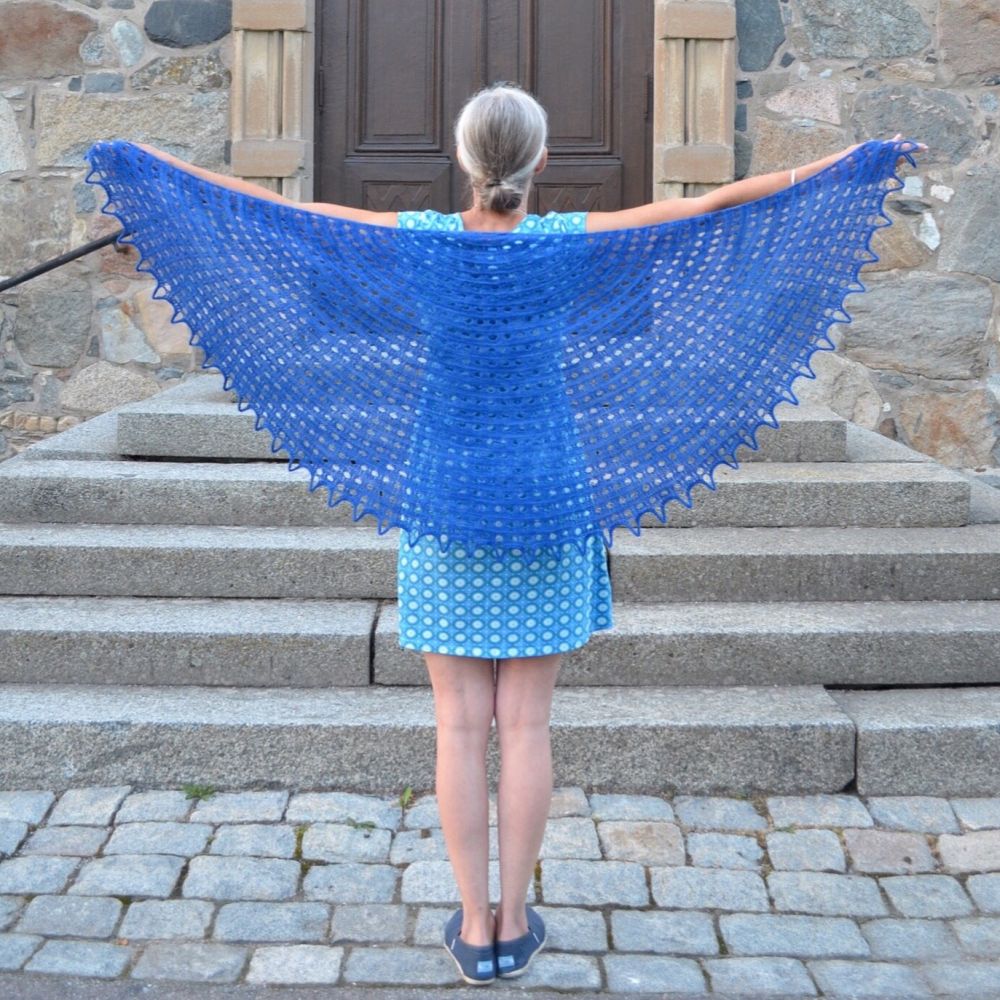 My Swedish knitting friend Maria Samuelsson designed a beautiful shawl named Durkslag (which is Swedish for colander).
I talked about the pattern on my blog, since I helped Maria with a French translation.
She has also published an English version of the pattern, available on her blog.
 I can’t refer to November 2015 without mentioning the terrible terrorist attacks in Paris, which shocked and saddened us all so deeply.
Please know that the support from people all over the world has counted and still counts tremendously to us all here in France. Many thanks also to those among you who have sent me personal messages.
I tried to express my feelings in this blog post.
The bullion stitch:
Recently, when researching new stitch patterns and ideas, I came across the bullion stitch – again. Of course, having spent years trying to explore and learn all there is to learn about crochet, I knew about the bullion stitch, which is frequently used in freeform crochet but also in Irish crochet. However, I must admit that I had never tried to tackle this Everest of the crochet world.
The basic idea for the bullion stitch is very simple: you wrap the yarn around your hook a number of times (typically between 5 and 10), insert your hook in your work and pull up a loop, yarn over and pull through all the wraps.
And that’s where the going gets tough. Sliding your hook and the yarn through all the yarnovers is not an easy feat.
After a couple of tries, some crocheters give up, and others decide to find a way to master the stitch. This latter category can be divided into two groups: those who will patiently work on making the stitch with only hook and yarn until their dexterity with the hook makes it possible, and those who are a little less patient and start to look for a shortcut.
The more patient crocheters will find a lot of interesting tips in Patrice Walker’s article here: http://hubpages.com/art/6-Tips-for-Making-the-Perfect-Crocheted-Bullion-Stitch. (I think Patrice reads this newsletter – hi Patrice, and thank you for your excellent article!).
You probably won’t be surprised to learn that I personally fall into the less patient category. This made me try a number of special tricks I found on the Internet. These special tricks all involve the use of specific additional tools or accessories to separate the hook from the wraps it’s supposed to slide through.
I quickly wrote off the latch hook method for lack of materials (I don’t own a latch hook). Otherwise, it seems like an efficient method to me, if it doesn’t bother you to change tools while working.
There are also lots of tutorials on the Internet showing how to work the bullion stitch using a piece of straw or tubing. I tried, but I didn’t like manipulating the straw when making the stitch. Have a try yourself and see what you think.
I remembered that I had seen a video of a Russian freeform crocheter making the bullion stitch swiftly and smoothly using a tapestry needle. I couldn’t find the video, but I started experimenting myself. This is my favourite « cheating » method for the bullion stitch so far.
I need to practice a lot before I acquire the dexterity of the Russian crocheter in the video. However, even if I’m far from being an expert yet, here is a photo tutorial for this method:
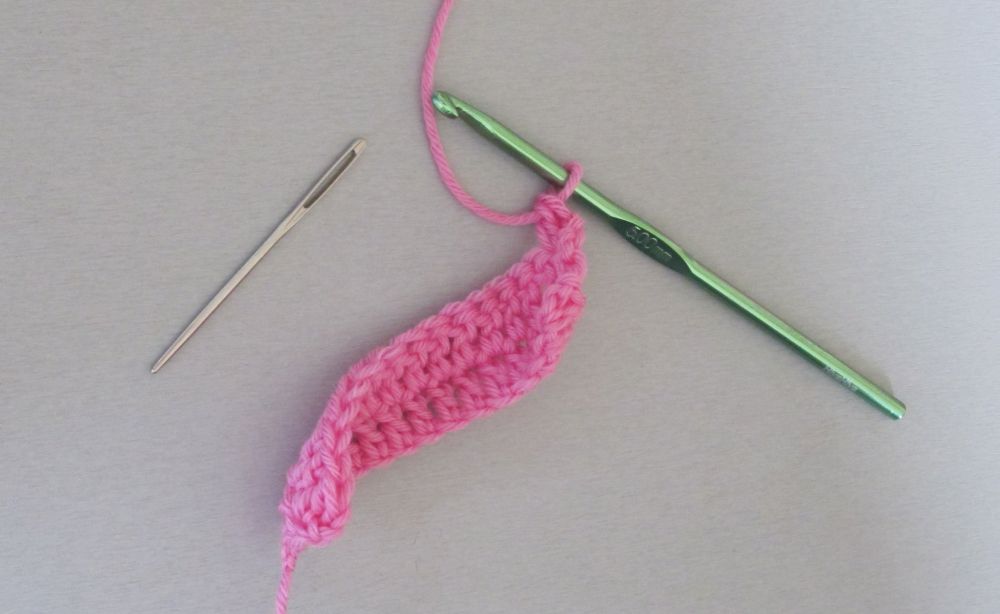
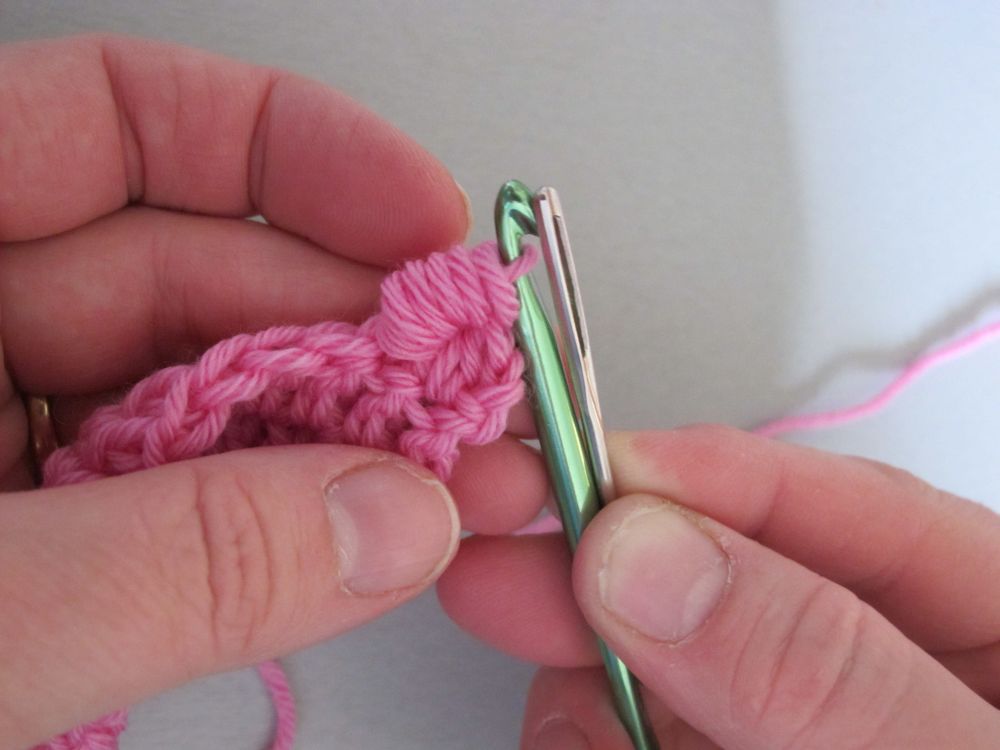
I worked my test swatch in Merino DK with a 5 mm hook, and used a rather large tapestry needle for the manipulations shown below.
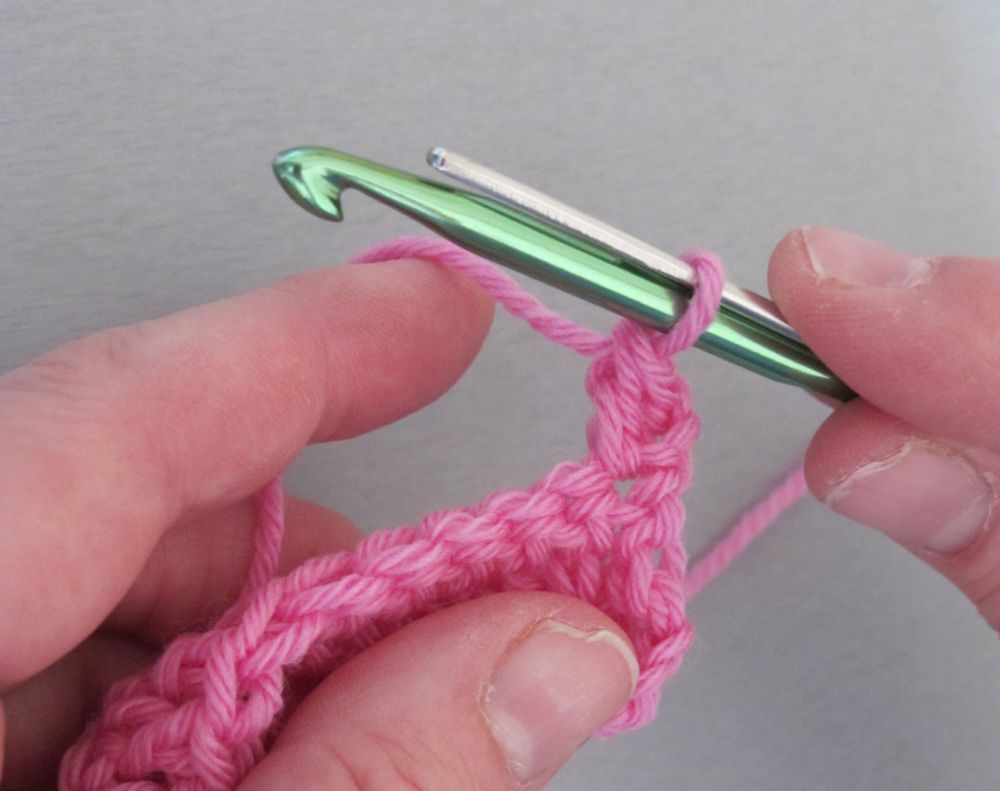
To start working the stitch, I place my tapestry needle on top of the hook, with the flat side of the eye against the hook. The actual « hook part » at the tip of the hook faces downward. I usually hold my hook with a pencil grip, but for the bullion stitch I use the knife grip. It’s easier this way to hold the tapestry needle in place.
I let go of the work and use my left hand to wrap the yarn around the hook. Make sure that all the wraps go around both hook and tapestry needle.
For this stitch, I limit the number of wraps to 5. When you get more practice, you can make more wraps. Now my right index finger holds both the wraps and the tapestry needle in place.
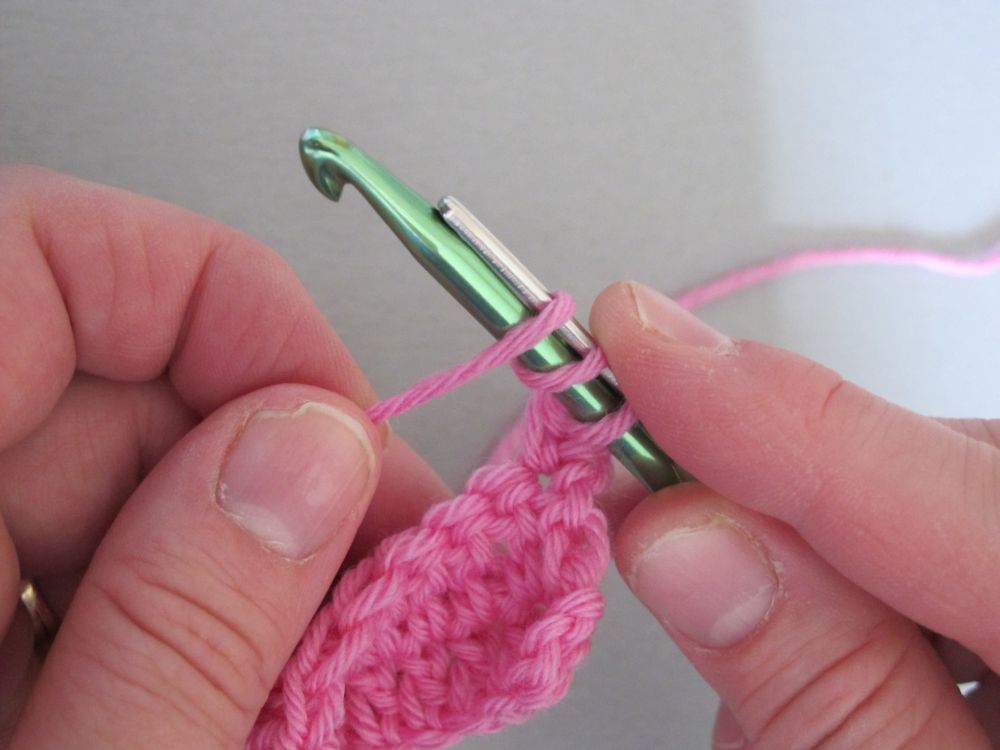
Here I have inserted the hook in my work and pulled up a loop. Normally, I should have made a yarnover and pulled through this loop, but it seems I forgot this during the photo shoot (probably because I was concentrating on a lot of things at the same time!). So in the pictures below, this is the loop that I’m going to pull through the wraps on the hook.

But before trying to slide anything through the wraps, I turn the hook upwards, so that the hook part faces the tapestry needle. Note that the loop is around only the hook, while the wraps are around both hook and tapestry needle. The hook should be firmly held against the eye of the tapestry needle. If the tapestry needle is relatively large, the eye will prevent the hook from sliding.

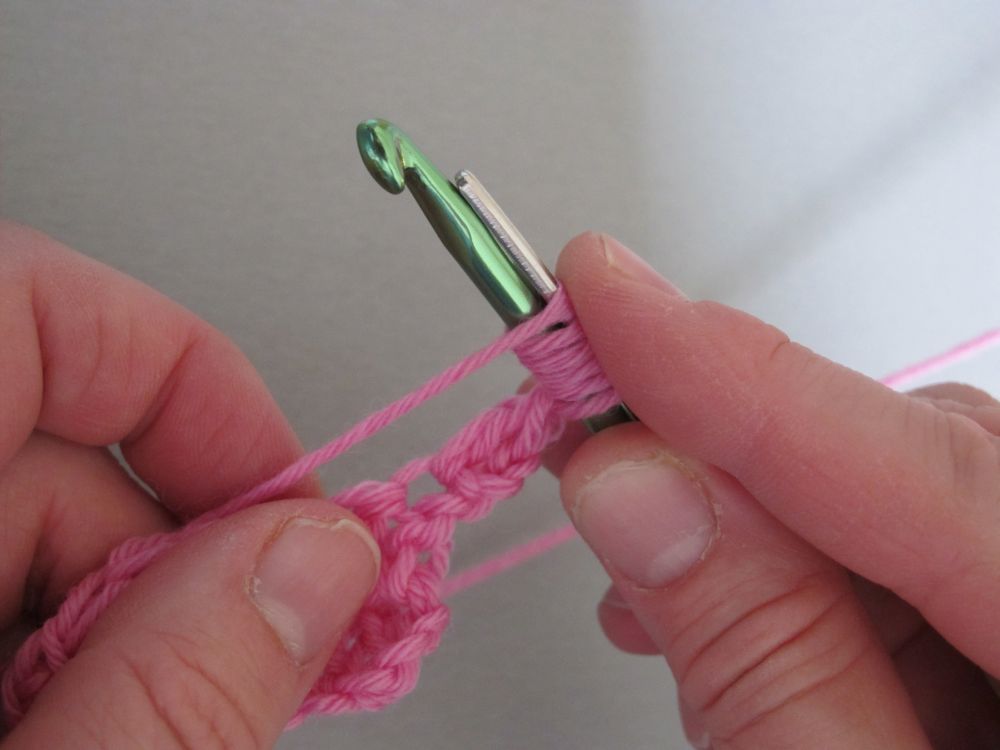
Now, instead of moving my hook to slide the loop through the wraps, I use my left hand to take hold of the wraps, and slide them towards the tip of the hook and off both hook and tapestry needle. This little trick made a big difference for me when I was experimenting with the technique. Moving the wraps instead of the hook makes it much easier to keep the hook and tapestry needle together.
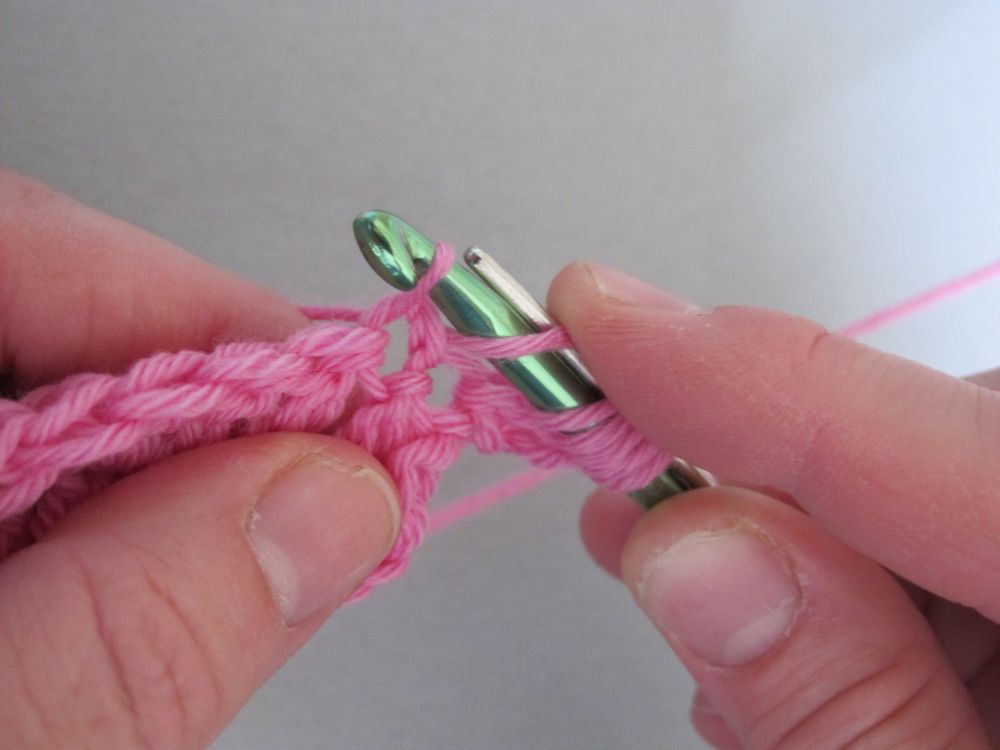
Voilà, we have a bullion stitch.
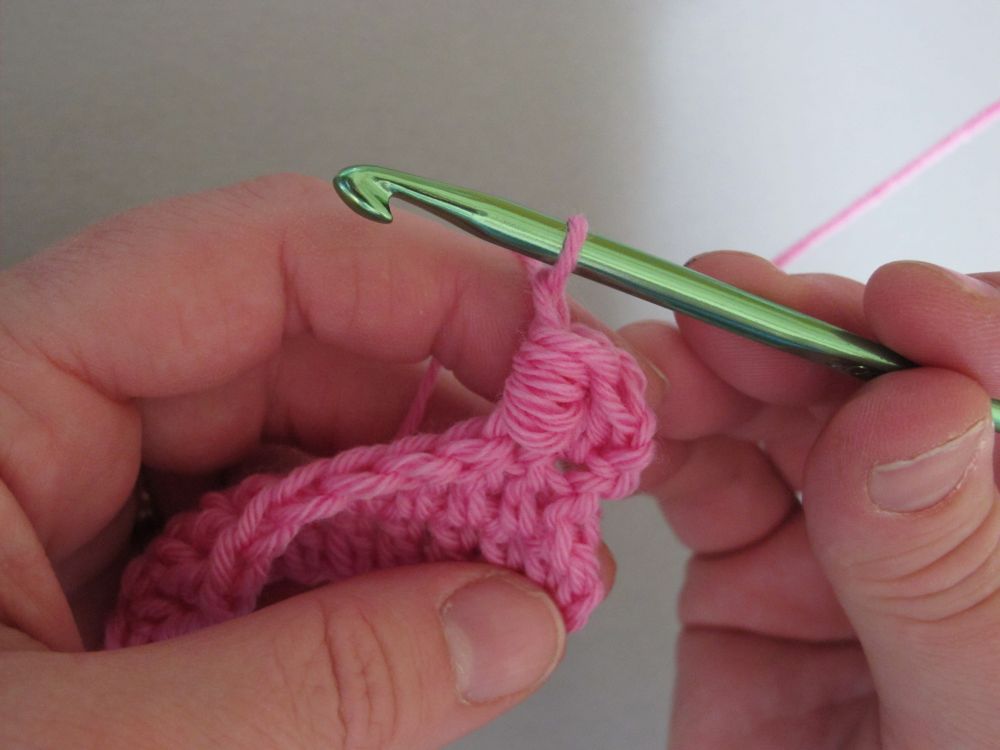
Finish the stitch by a « yarn over and pull through ».
So, this is how I currently work the bullion stitch. Perhaps you have other tricks or ideas? Go ahead and share them in the comments below!
See you soon!

Hey Annette, merci beaucoup for the « shoutout »!! I’ll share this on my Facebook page 🙂